![]()
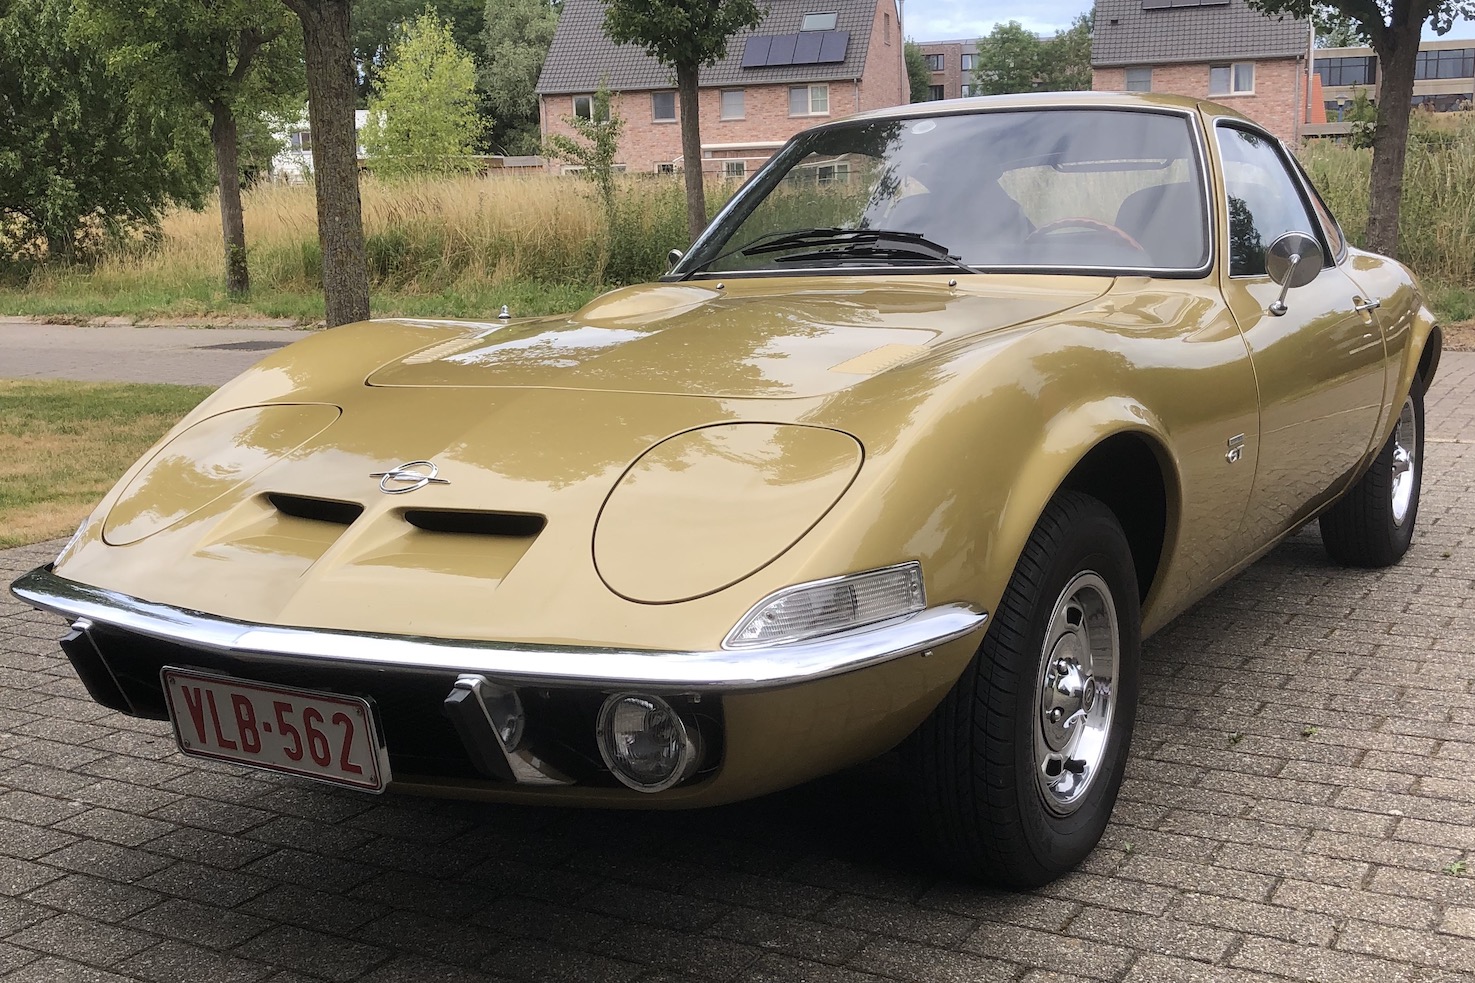
| Opel GT 1900 |
|
A great design |
 |
| the Opel GT is a great design |
|
You have guessed it, the Opel GT is my favourite car! I would rank this beautiful little car amongst the greatest car designs ever, like the Lamborghini Miura, Ferrari 250 GTO, Jaguar type E, Ford GT40 etc. Sheer beauty, from every angle! This page covers the history of my first Opel GT and it's problems, the history of my current GT with some restoration elements, substituting a Weber carb, adding power steering, also an infortunate invasion of mice, some information on forums and clubs, and on some gatherings. A few interesting facts about the Opel GT in general complete this page. You can have a taste of what it's like to drive this beautiful car, just watch and enjoy this video tribute my son Bert made back in 2014: youtube video
click on image to view this youtube video |
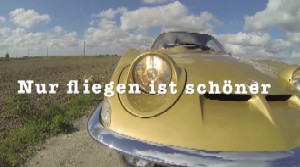
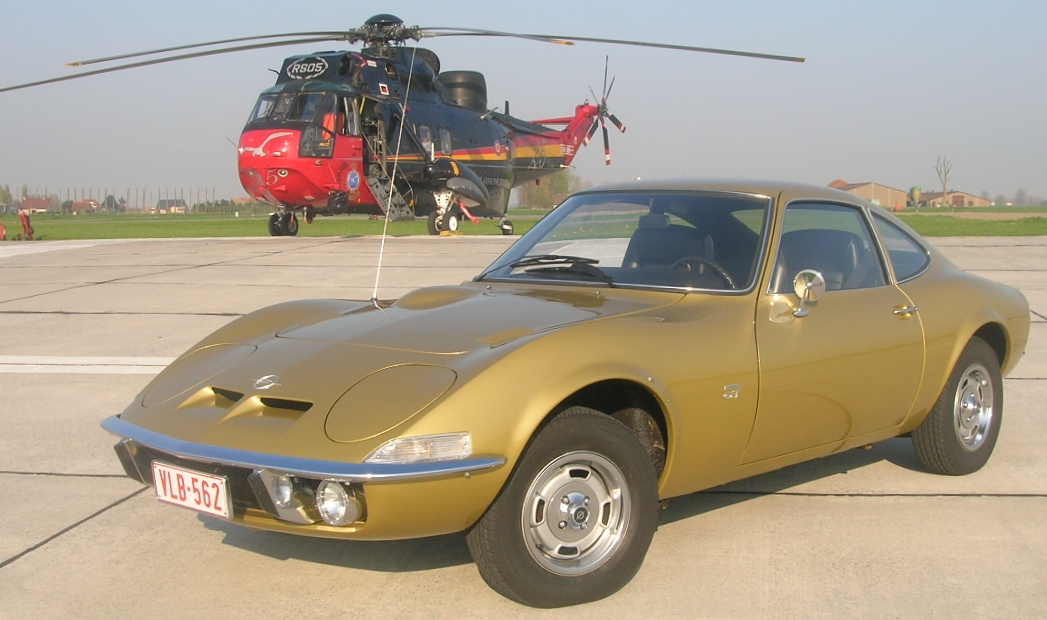
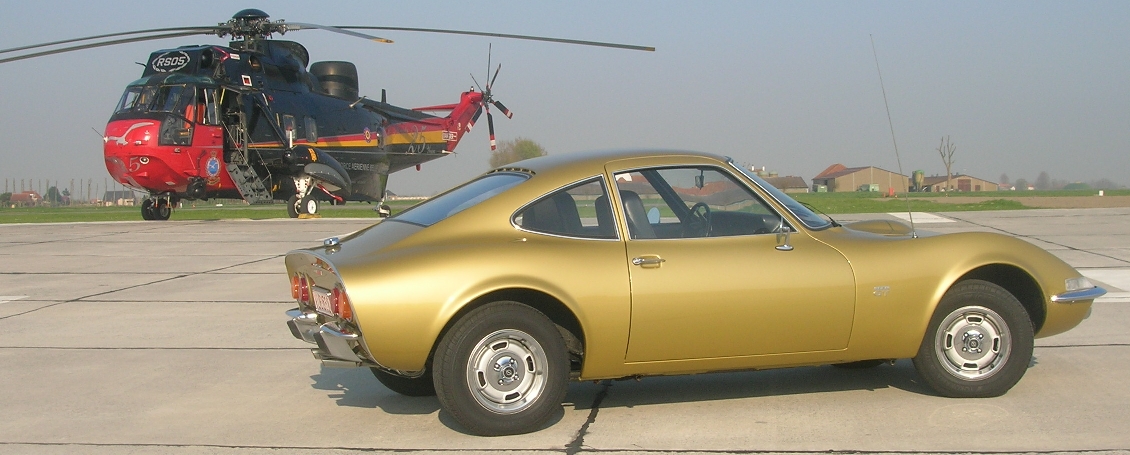
| Nur fliegen ist schöner |
|
GM used the slogan "nur fliegen ist schöner" (only flying is more beautiful) to advertise the Opel GT in Germany, making the car very popular with pilots. Many adverts showed the Opel GT with an aeroplane in the background. Below are a few similar photographs together with a special paint Sea King I often flew as a pilot and belonging to the 40 Sqn Heli of the Belgian Air Force, based at Koksijde, Belgium. |
 |
| nur fliegen ist schöner 1 |
 |
| nur fliegen ist schöner 2 |
 |
| nur fliegen ist schöner 3 |
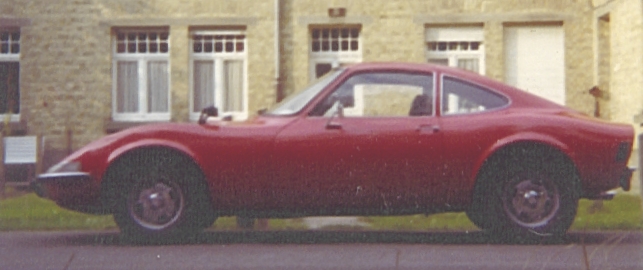
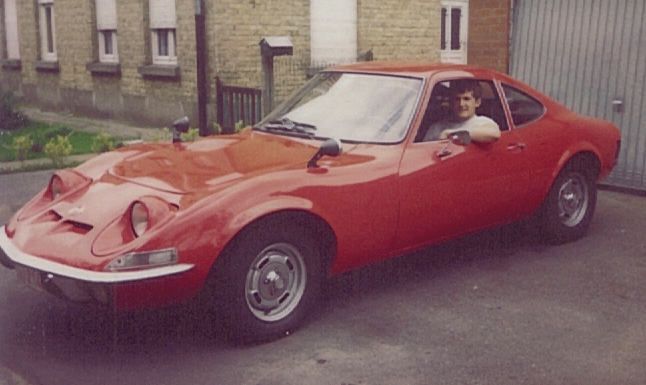
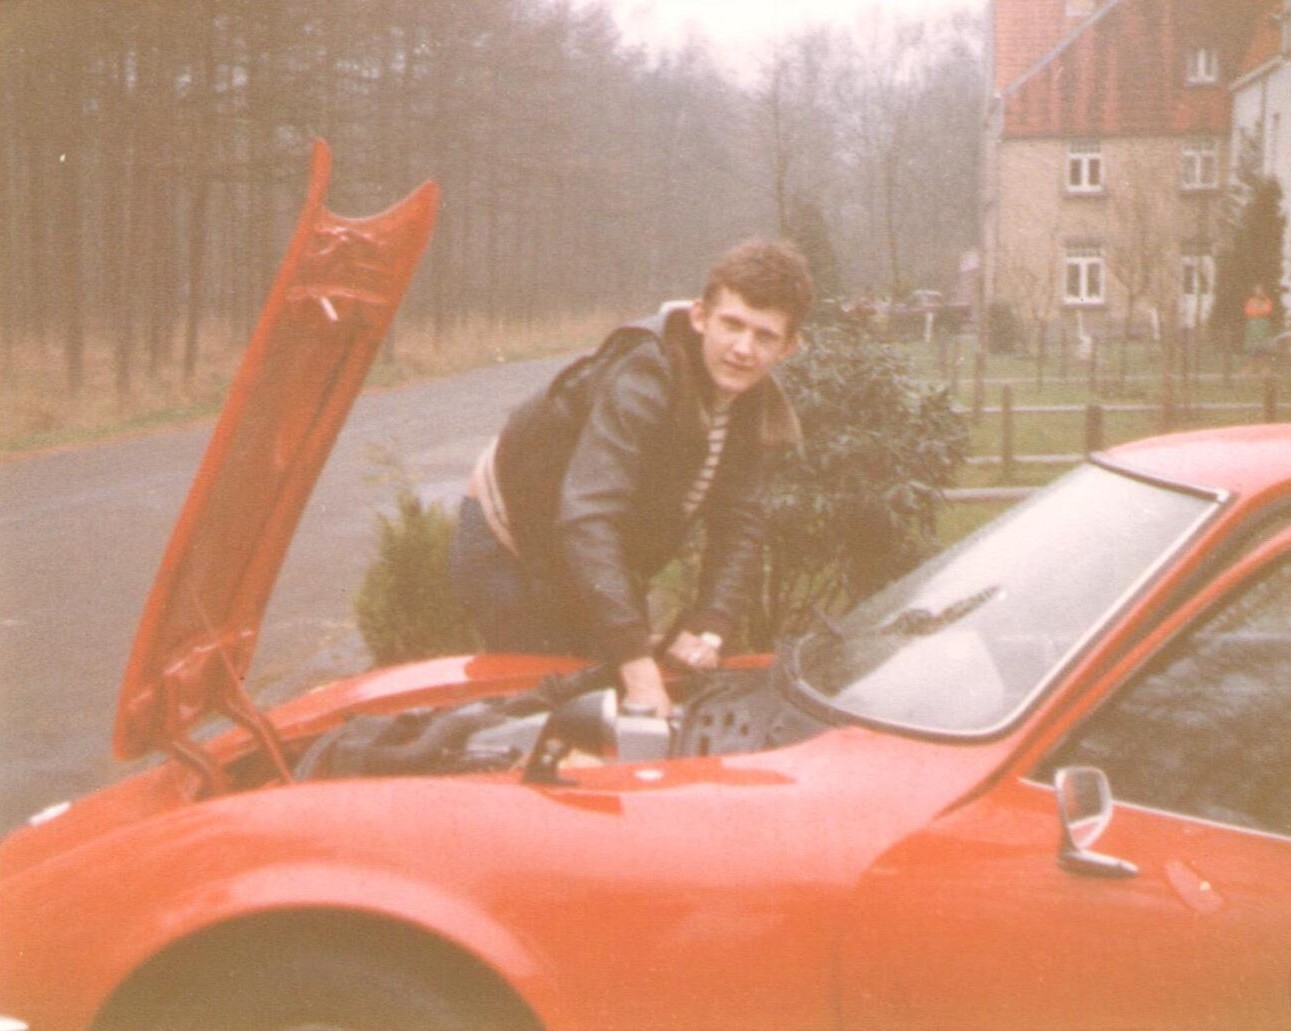
| Good looking red american... |
|
I owned my first Opel GT from 1978 till 1981. I was still in pilot training (flying Fouga Magisters) when I found this second hand car for sale. Being young and inexperienced, I bought this GT which looked very nice at first sight but appeared to be a problem car. It was a USA reimport or perhaps it was a USA car which had never been exported... It had been repainted in red (Standox Fiat red) on the outside only. The rear side markers were overpainted in black. |
 |
| my first Opel GT was repainted red when I bought the car |
 |
| it had additional aftermarket mirrors installed... |
 |
| ...but the chrome wheel rings were missing |
| ...with lots of problems |
|
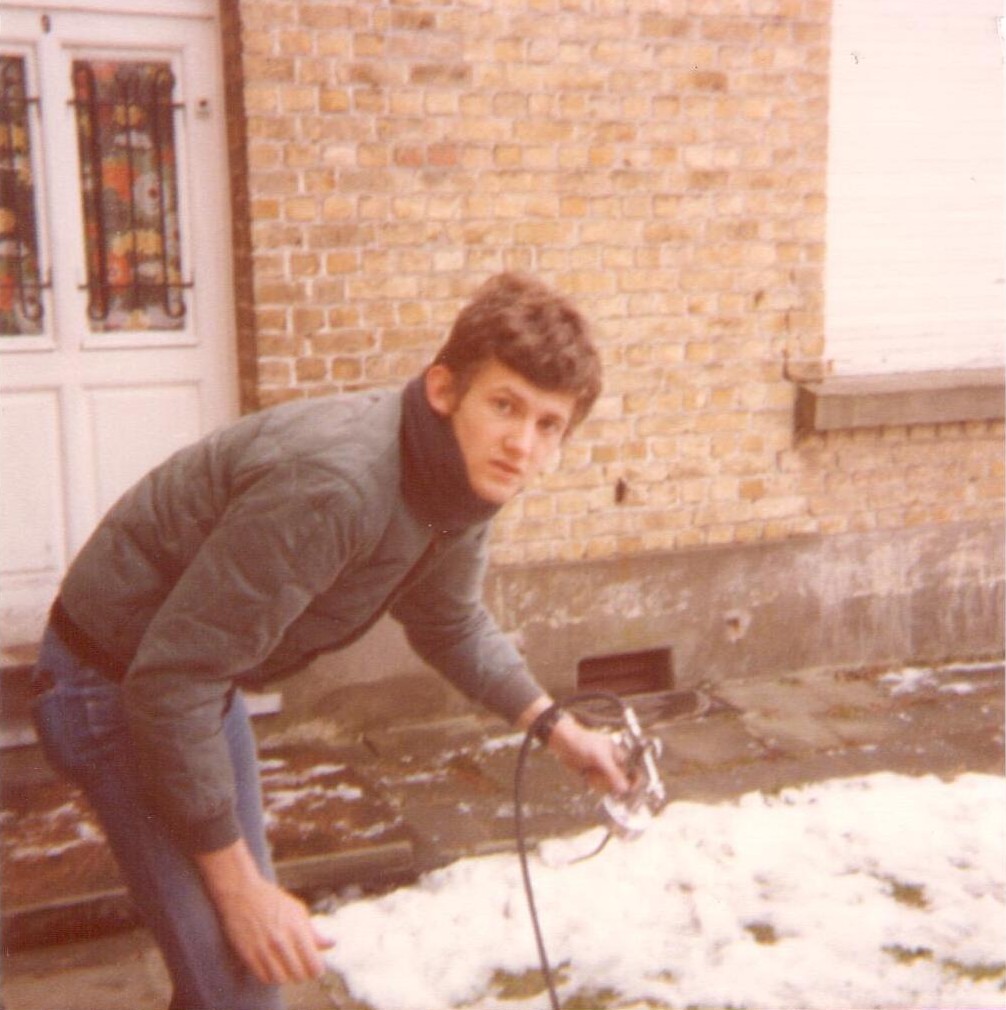
These were the problems I can recall: waterpump (typical), head light revolving mechanism, steering rack and pinion, broken front leaf spring, throttle linkage, erratic running, troublesome emission control system, battery charging, non working heater and the nightmare of all GT owners: lots of rust... |
 I spent a lot of time doing maintenance work... |
|
And as if that was not enough, another car crashed into the right hand side. I had to find and buy another door, install it and repaint it, all within the same weekend. I did the complete repair including the paint job out of doors with snow on the floor... |
 |
| that's how I came home after the crash |
 |
| paintwork on the repaired door outside in the cold... |
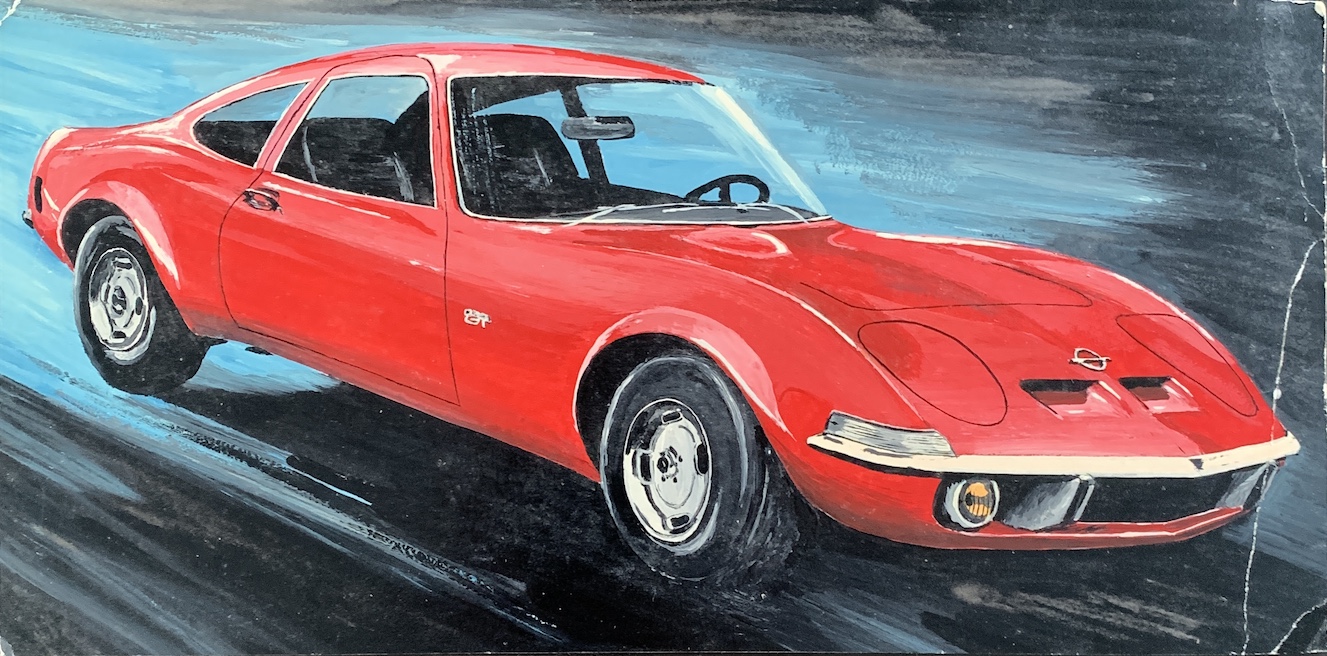
| Opel GT artwork |
|
Around that time, I got inspired by a box top artist impression of a Revell 1/32 plastic model kit of an Opel GT to make a painting of my red car (essentially a copy of the Revell artwork in a different colour). The result can be seen below.
my painting of my Opel GT (time window between 1978-1980) |
| Repaint in original colour |
|
I eventually repainted the car in its original metallic blue colour, trying as best as I could to repair the rusted areas. The initial aftermarket mirrors were replaced by a pair of nicer looking examples which received the same colour as the body. The original wheels were replaced by Borranni wheel rims with wider tyres. I don't recall the exact size but I believe I had 205's at the rear and 195's at the front. I managed to install the original chrome center hubs on the Borranni and that looked quite good. |
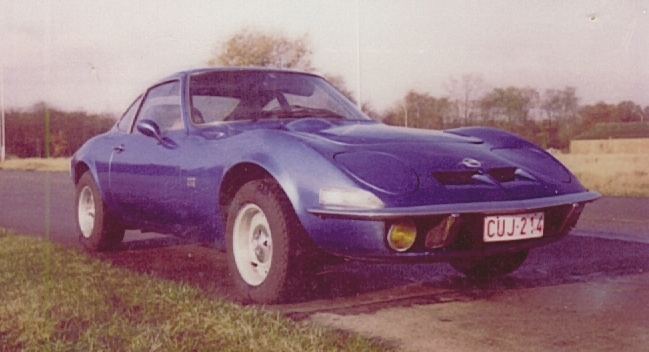 |
| repainted in the original colour and equipped with... |
 |
| ...nice looking aftermarket mirrors and wider rims and tyres |
|
I needed a more spacious car in anticipation of the birth of my daughter, so I sold the Opel GT. I was flying F-104G Starfighters at that time. For a long time, I regretted I hadn't kept the car in storage. Now that I own a GT again, I'm glad I didn't keep that first very troublesome one! My current GT is indeed a much, much better car! |
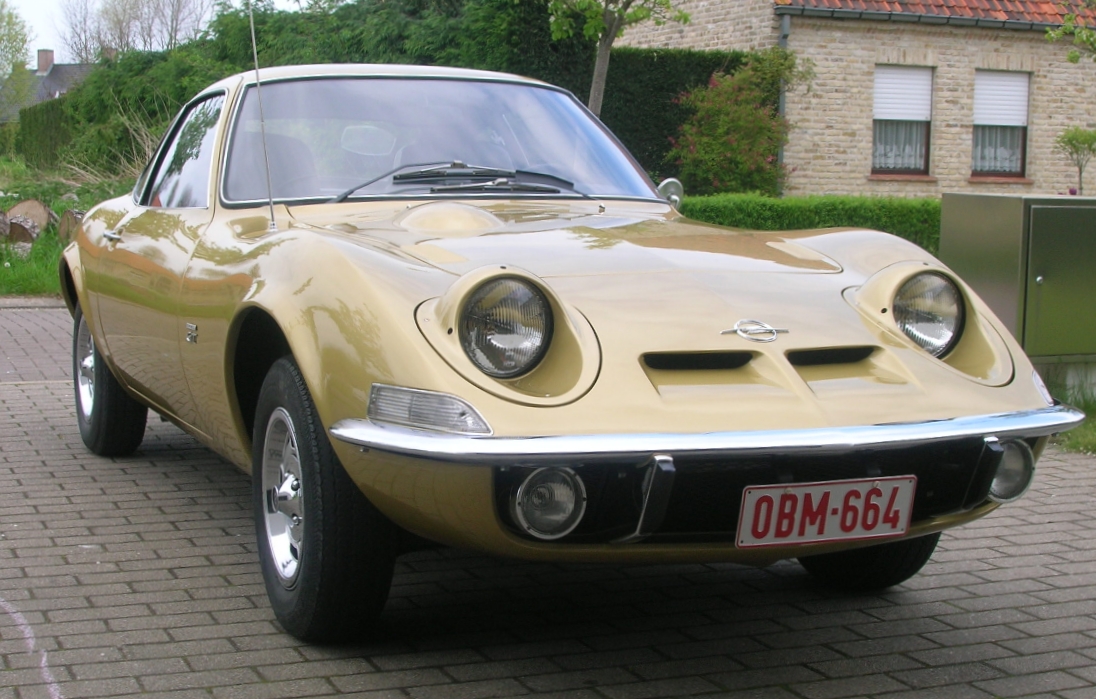
| History of my current GT |
| Build date and first owner |
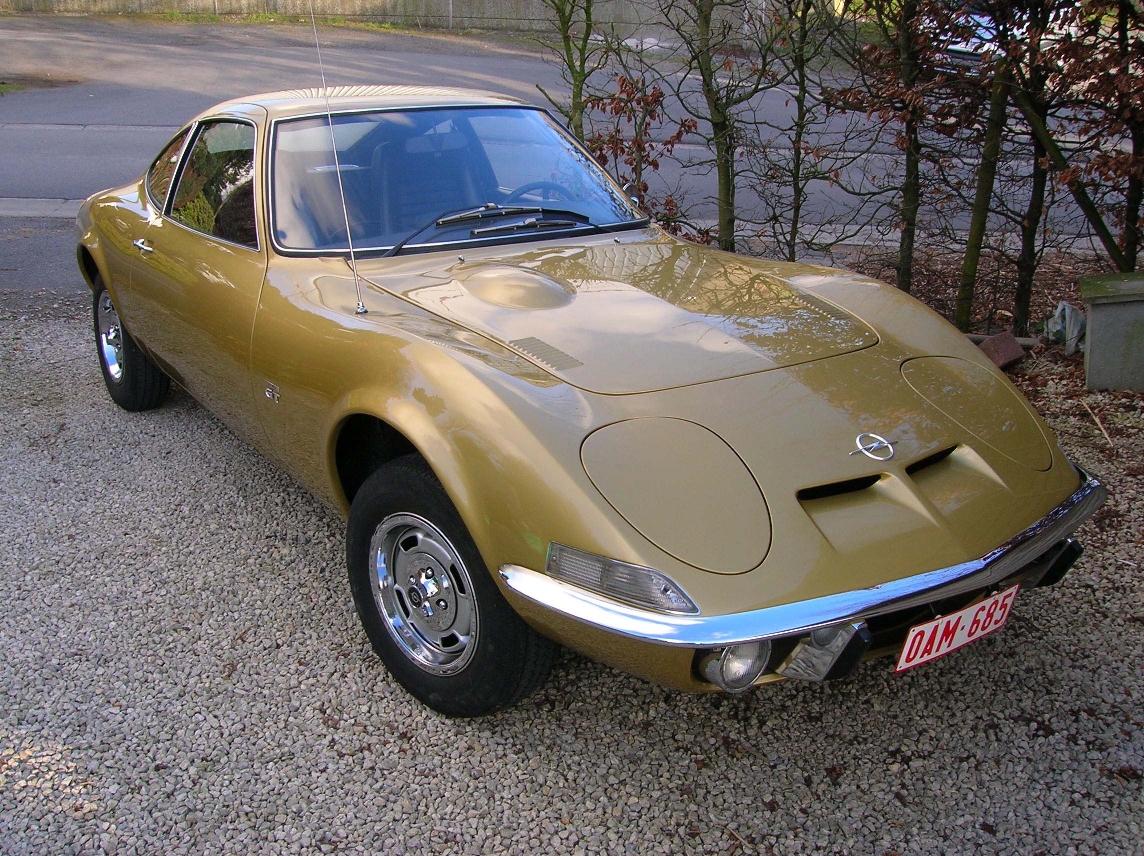
|
My current GT is a 1900 GT-A-L model kept in a 99% original state. An inquiry with the Opel history centre in Germany revealed that the car was a 1970 model with a 1969 colour (DD Gold) and an exact build date of 09 September 1969. The car was delivered to a car dealer in The Netherlands (probably Van Twist from Dordrecht, which was the main Opel Dealer and from there to P.L. Boer (Pieter Leendert Boer), a subdealer from Ridderkerk, as indicated on the original manual in Dutch language. It was subsequently bought by a Dutch or Belgian gentleman living in Brasschaat (Belgium), which is close to the Dutch border. The Opel GT was definitely not cheaper accross that border, but a special export procedure sometimes made it interesting for Belgian residents to buy a car in The Netherlands. I don't know if that was the motivation for the first owner or if it was the immediate availablity (the delivery time in 1970 was quite long due to the huge sales success of the car in the USA and the limited production capacity). Anyway, it was registered for the first time in Belgium on 15 September 1970, so a bit over a year after the build date (perhaps the export and subsequent import procedure took a long time). The first owner took great care of his car and I'm very grateful for that! He had the car treated for corrosion prevention ("Dinitrol") probably right after purchase and that has proven to be of utmost value on this otherwise rust sensitive car. Also the interior is extremely well maintained! |
| Second owner |
|
The second owner, a gentleman from Staden (Belgium) bought the car in April 2003 with around 22.000 km on the odometer. He had the car professionally repainted in the original colour (DD Gold). The factory paint had suffered from minor blemishes and scratches as a result of the car being driven regularly over a period of 32 years. The new paint job is very well done indeed even though only the exterior was done. The interior parts did not require any repaint as everything was still in excellent shape (thanks to the "Dinitrol" which is still present on the car today). He kept the Opel GT for 3 years. |
 |
| for the last time at the previous owners home... |
| Now mine! |
|
I purchased the car in this state from this second owner on 19 April 2006 with 24.400 km on the odometer. I was very suspicious for hidden corrosion but having owned the car for a longer period now, I have yet to find the first spot of rust! The previous owner did however not possess all the mechanical and electrical knowledge and skills required to maintain a car 100% operational, so I had to fix a couple of issues when I took delivery of the car. |
 |
| ...and delivered to my door |
| Opel GT forums |
|
I found a lot of information on specialised Opel GT internet forums in Germany, The Netherlands and USA. This helped me a lot to do the proper repairs on several issues I had: turn signals, fuel indication, battery charging, headlight switching, instrument panel lighting etc. These forums are a wealth of info and I do recommend them without hesitation! As such, I was aware of safety issues with possible chafing on the revolving head light wiring, so I added relays and fuses for circuit protection. I also replaced the brake lines which had swollen, this had been suggested on the forums as well. I can say that I know a hundred times more about Opel GT's now than I did back in the time I owned my first GT. |
|
| revolving head lights still work perfectly |
| Cosmetic repairs |
|
Some cosmetic repairs were carried out soon after taking possession of the car: new taillight housings and lenses, new rear turn signal housings and lenses, new licence plate lighting lenses, new reverse light housing and lens, new front turn signal lenses, new H4 headlights, new door seals, new windshield wipers and a few other things. I also replaced the dented carb air filter adapter with a second hand one and I installed chromed valve cover and radiator caps. Finally I replaced the rear bumpers with freshly rechromed ones. There was a dent in one of the old ones. They were perhaps still good enough for a daily driver but I wanted them to look as new... |
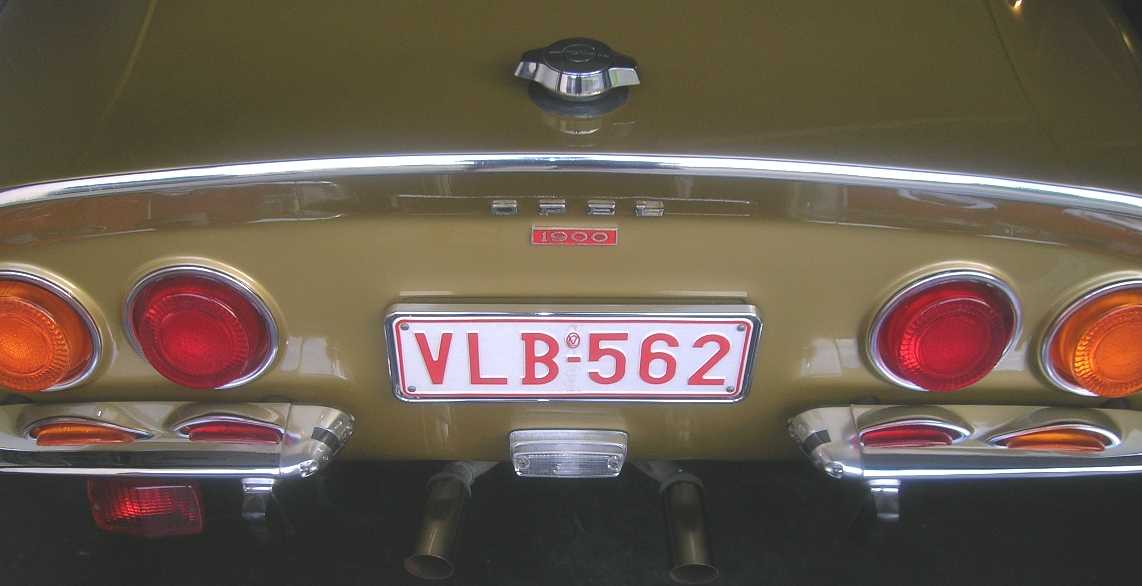 |
| all new rear lighting housings and lenses |
| Sources for spares |
|
I bought most spare parts from the stands of Splendid Parts (Germany) and Wil Beister (The Netherlands) while visiting the 2006 Euro GT Treffen in Kevelaer (Germany). Some other parts were mail ordered from both Suselbeek (The Netherlands) and again from Splendid Parts (Germany). All these companies delivered first class parts and service! I also wish to thank OTAK, a local car parts company from Veurne, Belgium for the excellent help they offered me in quickly finding specialised parts and for helping me in rebuilding the broken fuel sending unit. |
| Radio restoration |
|
Quite a rewarding job was to restore the Philips radio which was probably installed by the Dutch dealer when the car was new. As the internals of the radio seemed still OK, the restoration only involved turning new knobs out of aluminium and making a new face plate. I did the latter by CNC cutting a new clear acrylic front plate and printing the matching waterslide decals. The result is shown below. |
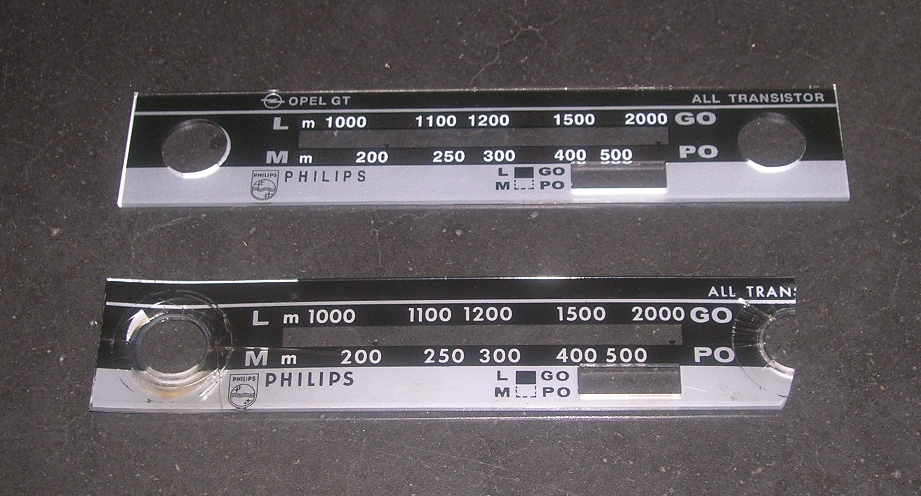 |
| repaired face plate with original broken one in foreground |
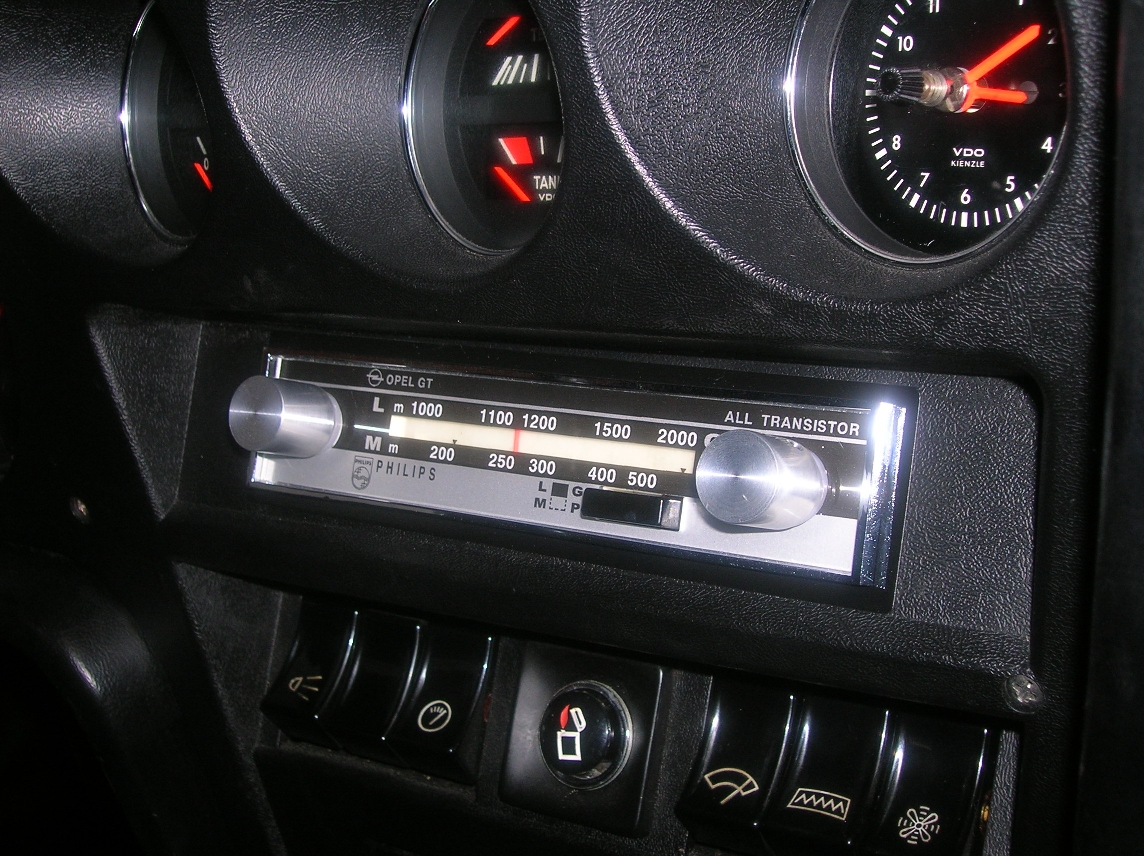 |
|
the restored radio installed in the car with the new aluminium knobs |
| A new door sticker |
|
I made a new sticker to go on the inside of the door. The ink on the original had been wiped away steadily after 37 years of beauty care... It's made by placing the laserprinted waterslide decal on a piece of self adhesive chrome effect plastic film. Here's the result. |
 |
| now we can read the tyre pressure again! |
| New tyres and she's ready to go! |
|
Finally the old and dried out tyres were replaced with a new set of YOKOHAMA S306 tyres. I chose for the 185/70 R13 size which look nice on the original rims. That's also what I had seen on most GT's with original wheel rims at the 2006 Euro GT Treffen in Germany. They are a touch wider than the original 165 size tyres but the diameter is identical so it does not have any influence on tachometer readings. I now hope the original freaks will not consider this as a sin... Incidentally, the thread pattern on the Yokohama tyre is a quite good match to the GT style and era. |
 |
| these Yokohama 185/70 R13 size tyres fit the original rims perfectly |
|
The spare tyre is still the original Goodyear G800 Redline 165HR13 size (identical to current 165/80R13). Belgian and Dutch Opel GT 1900-A-L cars were normally delivered with these stilish redline sidewall tyres in 1970. |
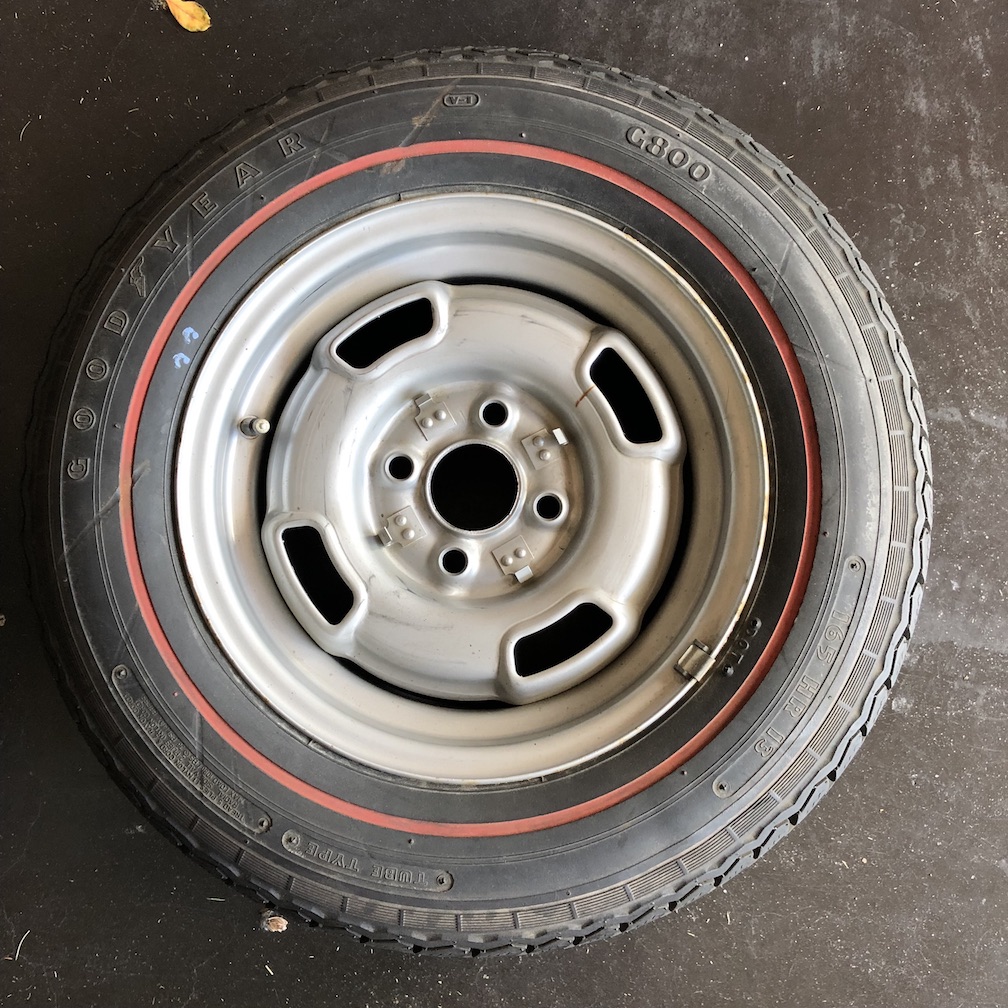 original Goodyear G800 redline sidewall spare tyre |
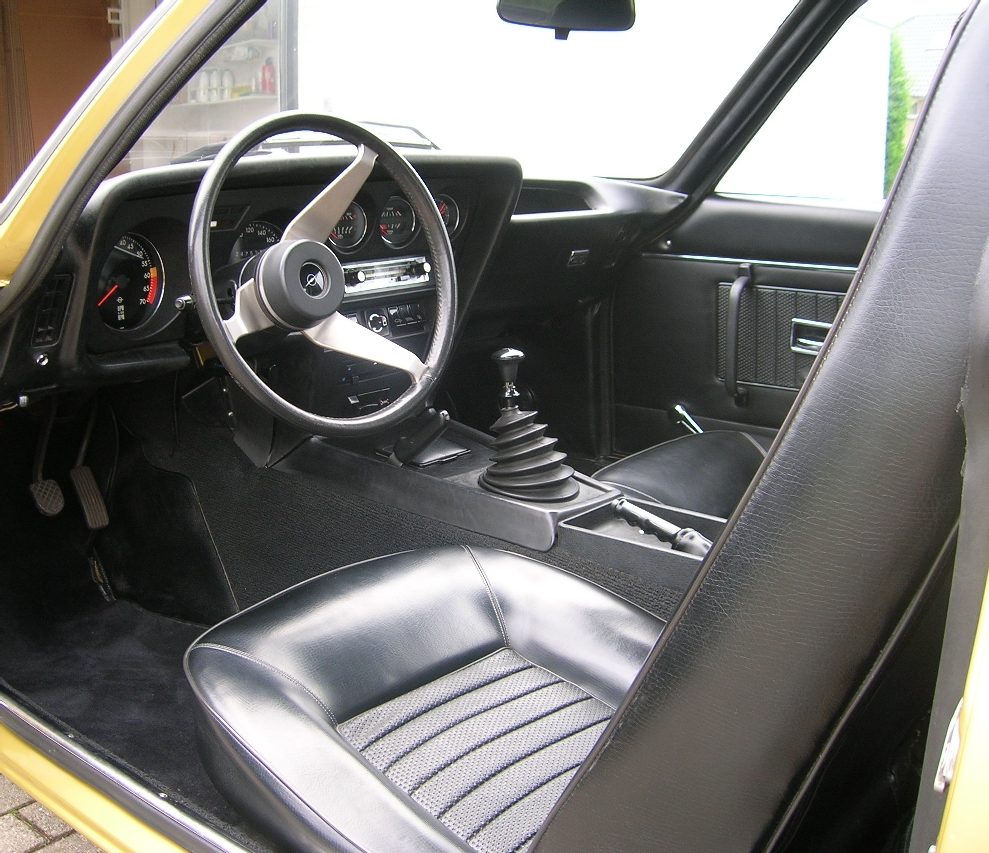
| Close to original state |
|
I do try to keep my Opel GT as much original as possible (but not fanatically). It still has the original wheel rims, which in my opinion are still the nicest rims for this car. The original Solex carb is far from perfect but I like the way the car runs (note: the Solex carb was eventually replaced by a Weber in 2015). The center console had the sticky back wood imitation but it was so badly wrinkled I chose to remove it alltogether. Frankly, I prefer an all black interior anyway (although later, I would install a real wooden steering wheel). A previous owner installed a chrome strip at the back, something many Opel GT owners tend to do but unfortunately it is not original. However, I like the looks and rather than spend a fortune on finding an original strip, doing a decent installation and having it painted in the body colour again, I'll just leave it as it is. I try to use original parts only but obviously, when only reproduction parts are available, I will use them. |
 |
| all black interior |
 |
| chrome strip at the back looks quite nice |
| More cosmetic improvements |
|
Just when you think you are settled, you slowly start to wonder what else you can improve. Small imperfections suddenly become major flaws in your eyes and there's nothing else to do than take care of them... |
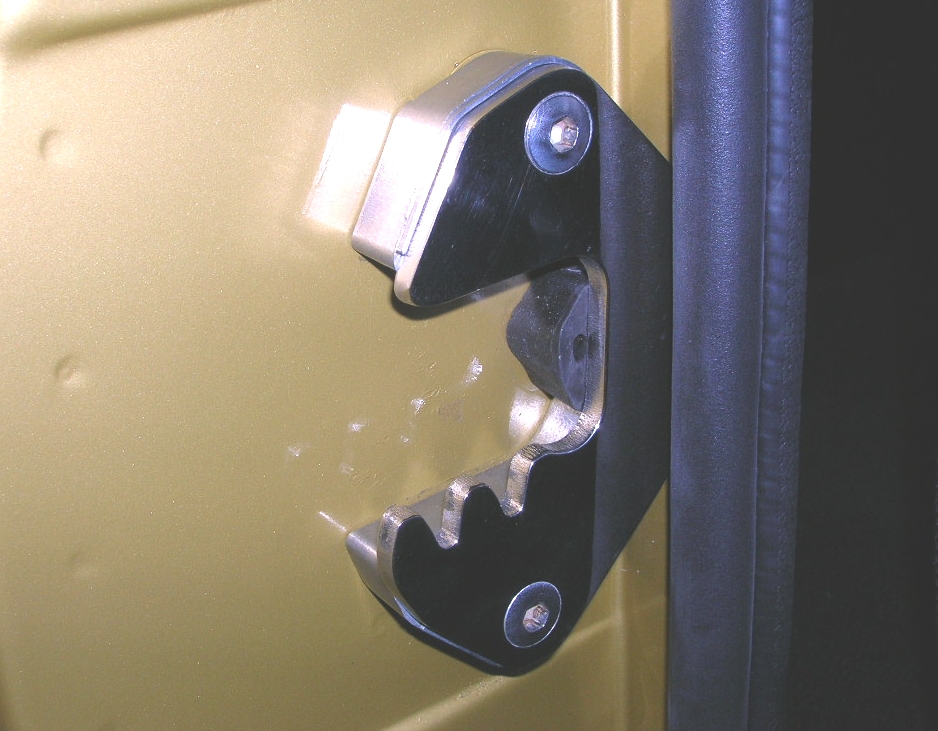
| Door claws |
|
The door claws on my car just cried out to be replaced. I bought a set of polished stainless steel reproduction claw plates. I removed the old plates (they were riveted onto the claw body) and brushed the claw body and bolts for a clean look. I then installed the claws including the new polished claw plates on the car. |
 |
| polished stainless steel door claw plate on brushed claw body |
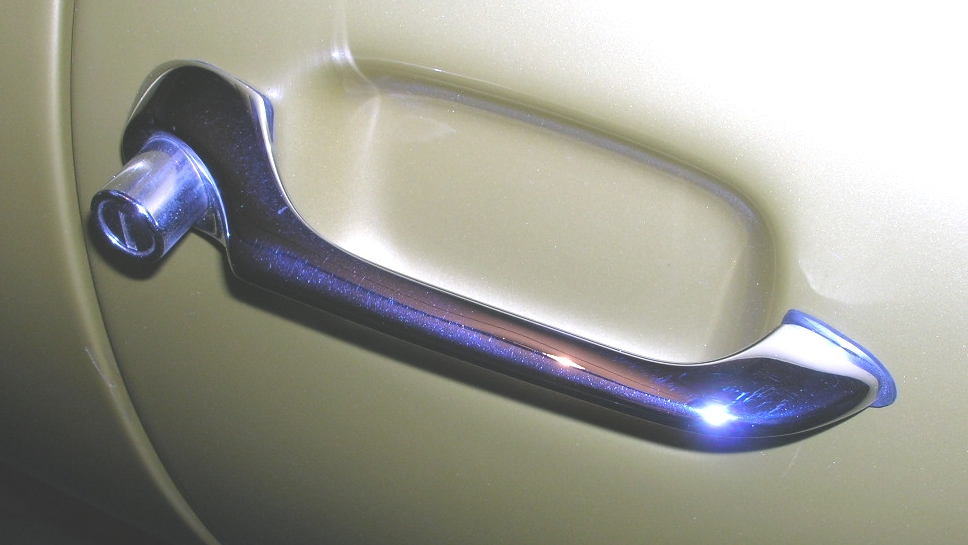
| Rechromed door handles |
|
The chrome on the door handles was pitted and had traces from sanding. To avoid immobilising the car for the time it would take to rechrome, I bought a pair of used door handles on eBay. I had them rechromed at Belcroom in Roeselare, Belgium. Although it was expensive, I'm very happy with the quality of the chrome, it is definitely superior to the factory new chrome. |
 |
| rechromed door handle |
| Door step trim |
|
The original door step trim was full of dents and scratches, so I replaced them with the excellent reproduction trim parts from Splendid Parts (Germany). These are polished stainless steel and although not 100% identical in cross section, they do fit rather well. |
 |
| new door step trim |
| Right rear view mirror |
|
The chrome on the left rear view mirror was heavily pitted and the glass was showing signs of aging, so a replacement was due. When Splendid Parts (Germany) released their new all chrome reproduction mirrors, I decided to take a pair and equip the right hand side with a rear view mirror as well. One can argue this is not original but the Swedish Opel GT's were factory equipped with the right mirror to comply with their stringent safety requirements. Anyway, I reasoned that safety was more important than the quest for the ultimate original car, so I installed the right mirror as well. |
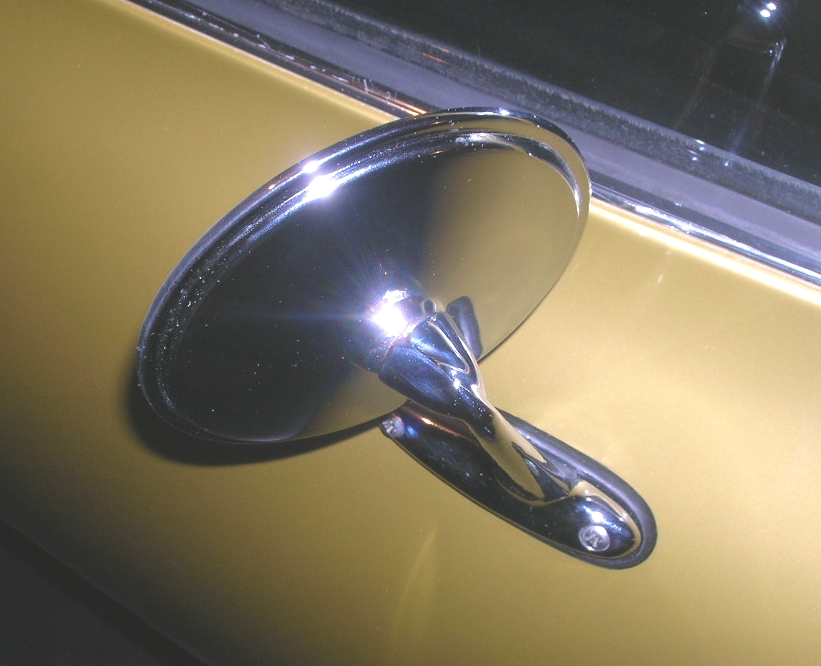 |
| right hand side chrome rear view mirror |
| Rear emblems |
|
The chrome on the rear emblems also suffered from pitting, so I bought replacements. The chrome reproduction "O P E L" letters were OK but the "1900" emblem was a cheapish looking self adhesive plastic affair. It looked so horrible I trashed it rightaway. Instead I decided to restore the existing emblem where the paint had chipped off in several places. The best match for the red colour I could find was RAL3001. I sprayed the emblem and after the paint dried, I carefully sanded the high points with 1500 grit sandpaper and lots of water to reveal the chrome edge and the "1900" numerics again. Unfortunately, the chrome is not perfect, so I hope to find an original new "1900" emblem some day! (note: I finally did) |
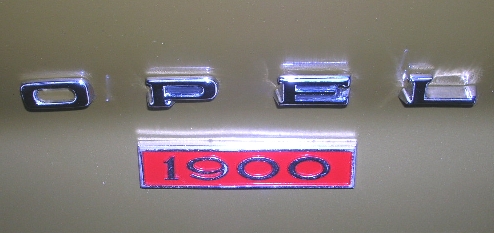 |
| "O P E L" emblem replaced and "1900" emblem partly restored |
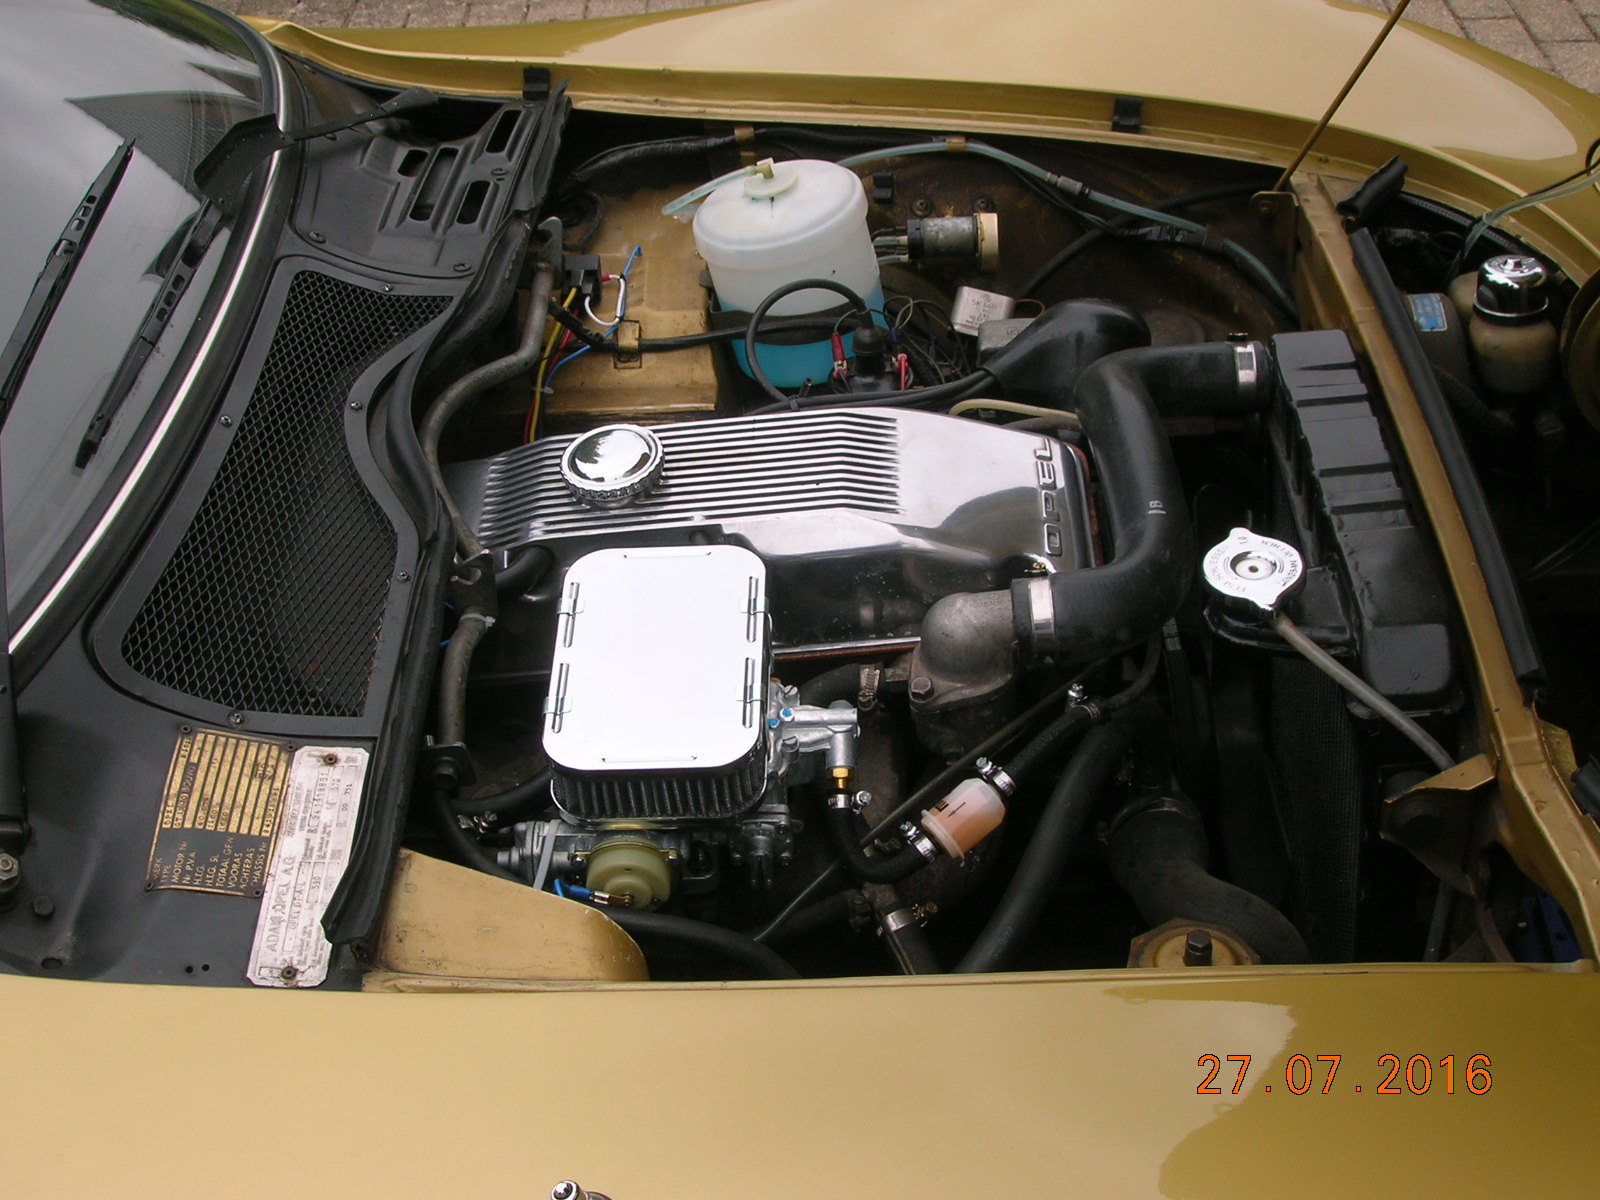
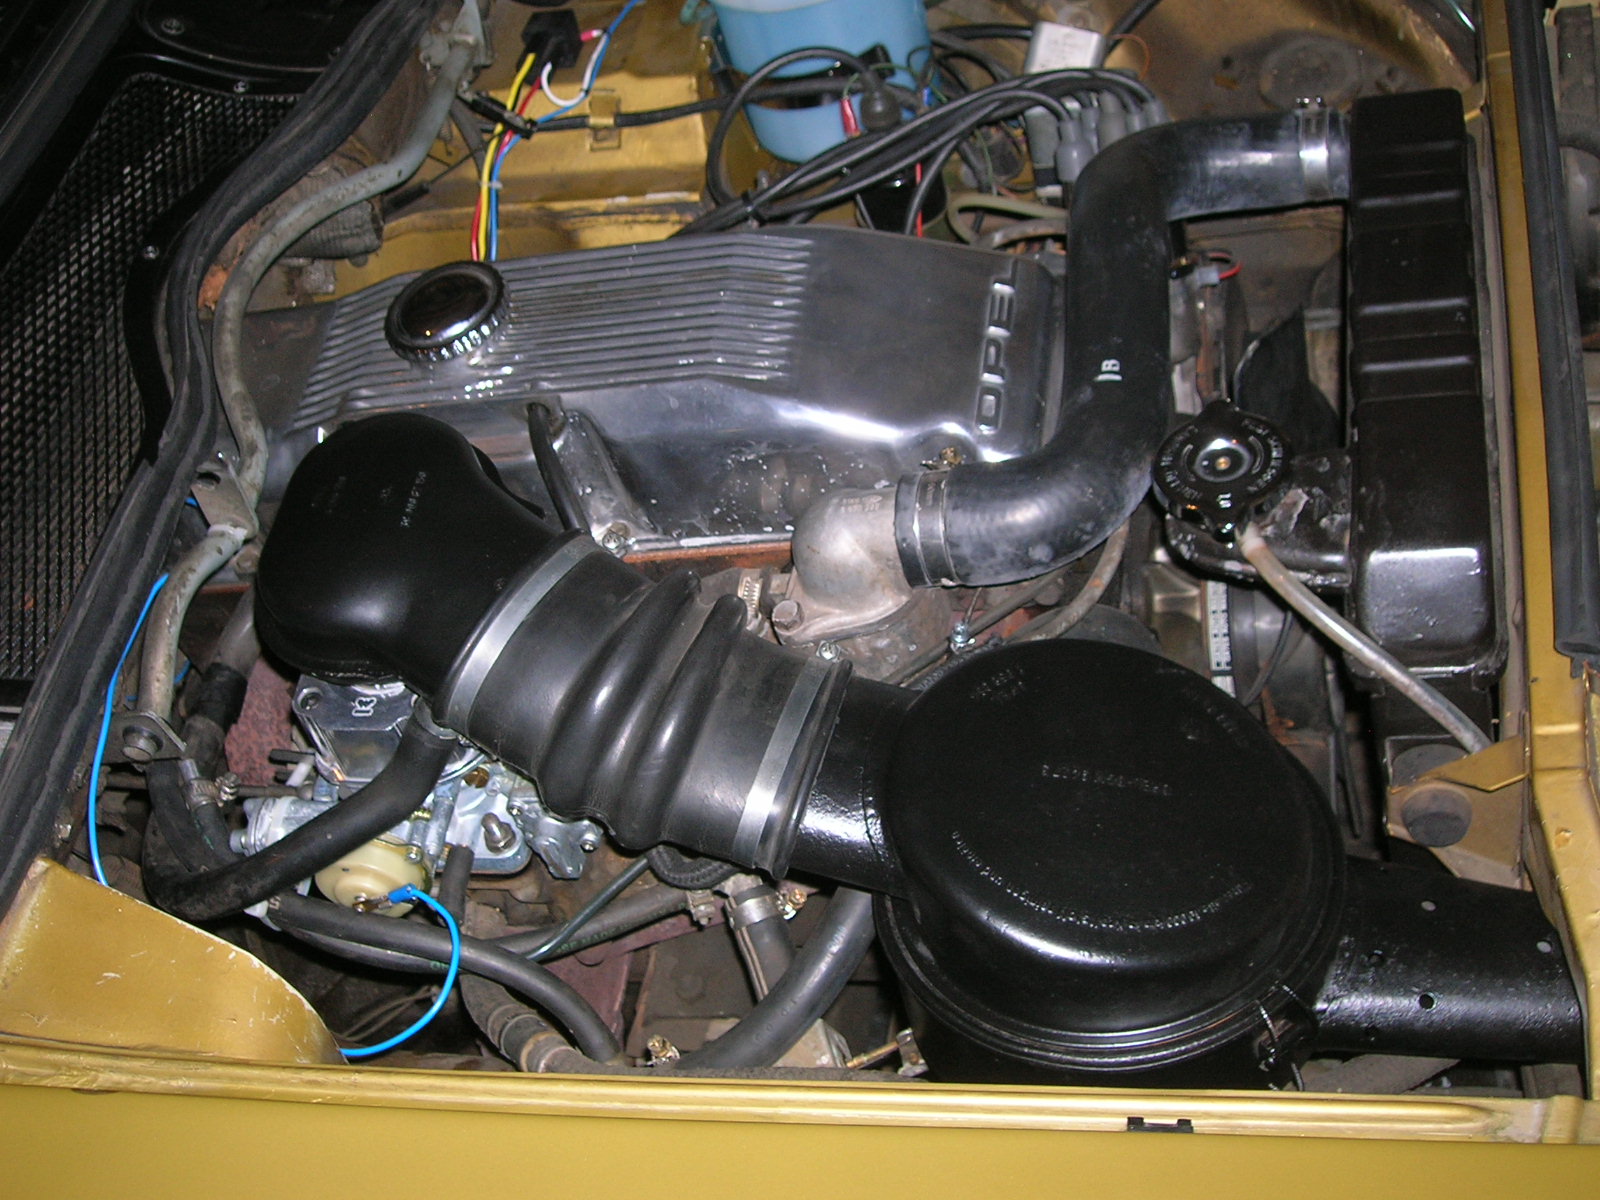
| Weber Carburetor |
|
During the summer of 2015, I decided to install a Weber carburetor to replace the aging and troublesome Solex carburetor originally installed. I bought a complete set, ready to install, from Splendid Parts in Germany. The installation was straightforward. I just followed the instructions on their Weber special page. The advantages of the Weber over the Solex are a better idle, smoother running, easier starting when warm and slightly less fuel consumption. Initially, I had a sport chrome filter installed, but after a few months, I made the necessary modifications to install the original air filter assembly to restore the original looks. I didn't like the intake noise of the sport filter anyway... |
 |
| Weber carb with sport filter at first |
 |
| final installation of Weber carburetor with original air filter assembly |
| Third brake light |
|
I was always concerned about visibility when stopping. People nowadays expect a third brake light, so for my peace of mind, I installed a third brake light inside the top of the rear window. I bought the 24 LED strip unit from Conrad. It is orientable and I have attached it to the car ceiling with magnets, so I can remove it in seconds to return the car to original. I'm very happy with this safety upgrade. Not only is the third brake light much brighter, the LED's light up a fraction of a second quicker than the standard brake lights. |
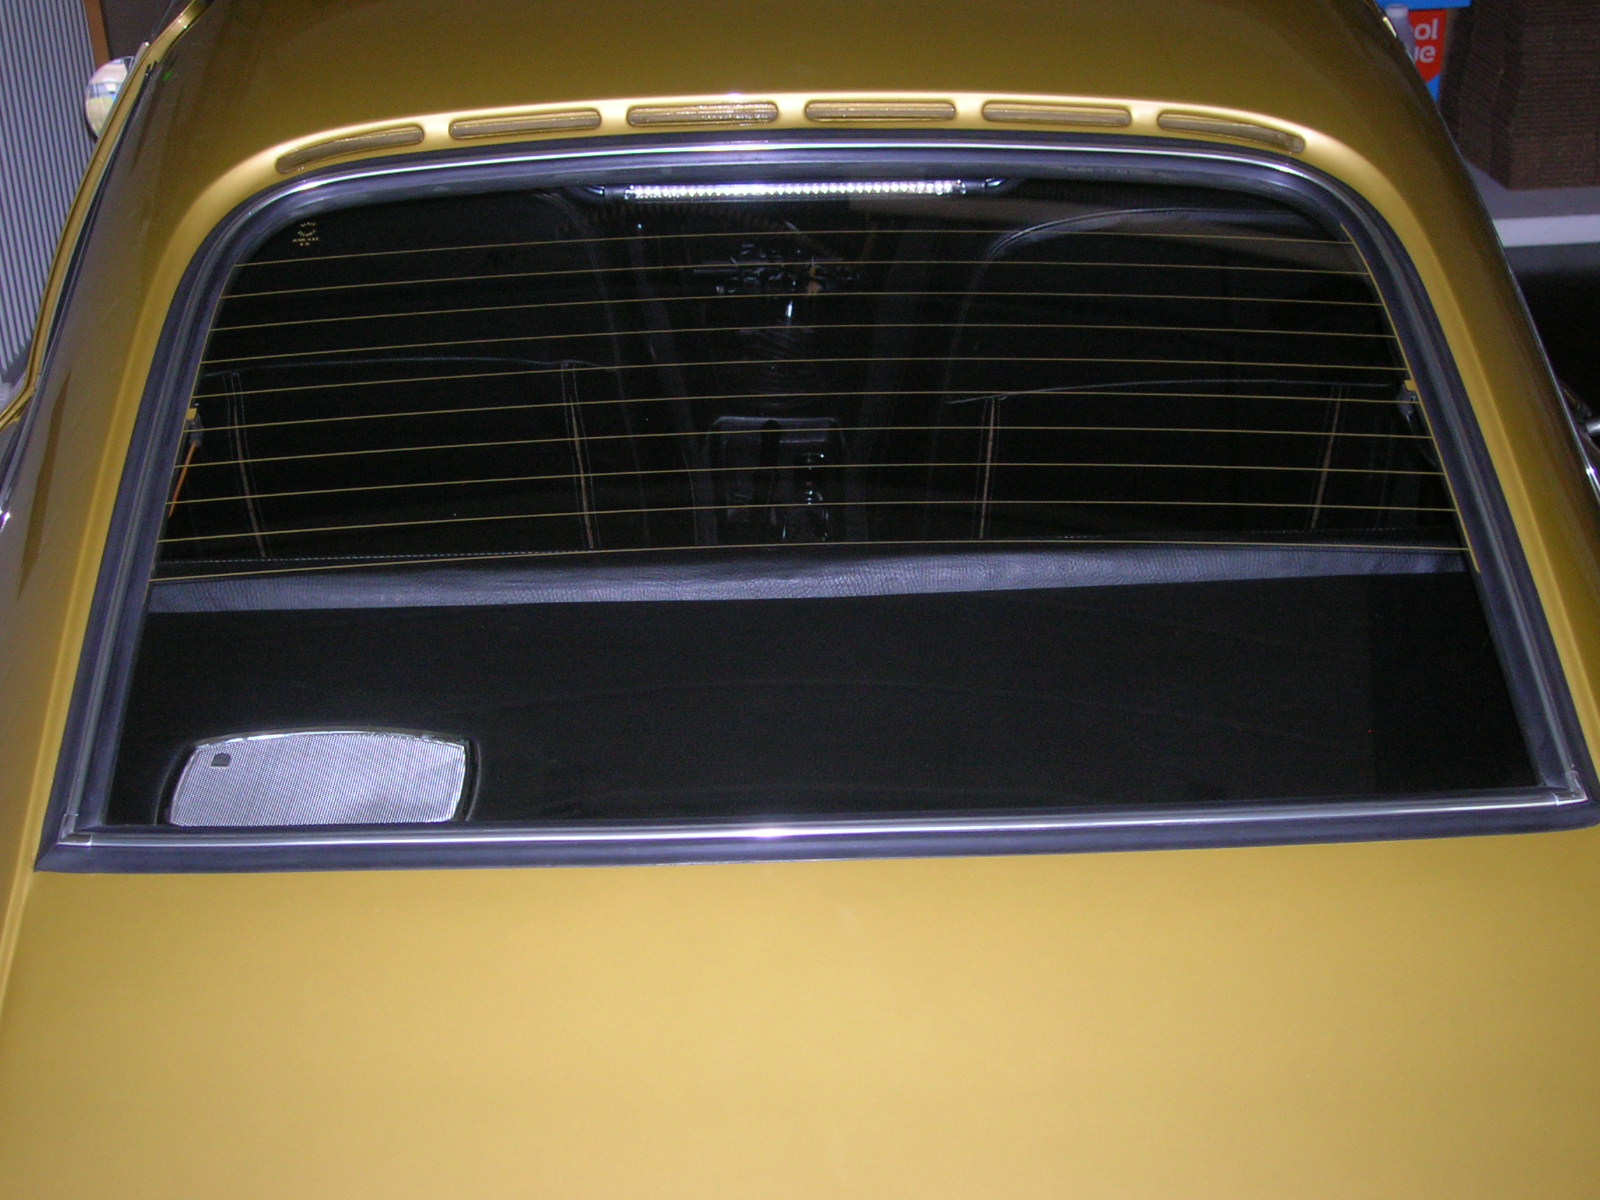 |
| third brake light is barely visible inside the top of the rear window when not lit |
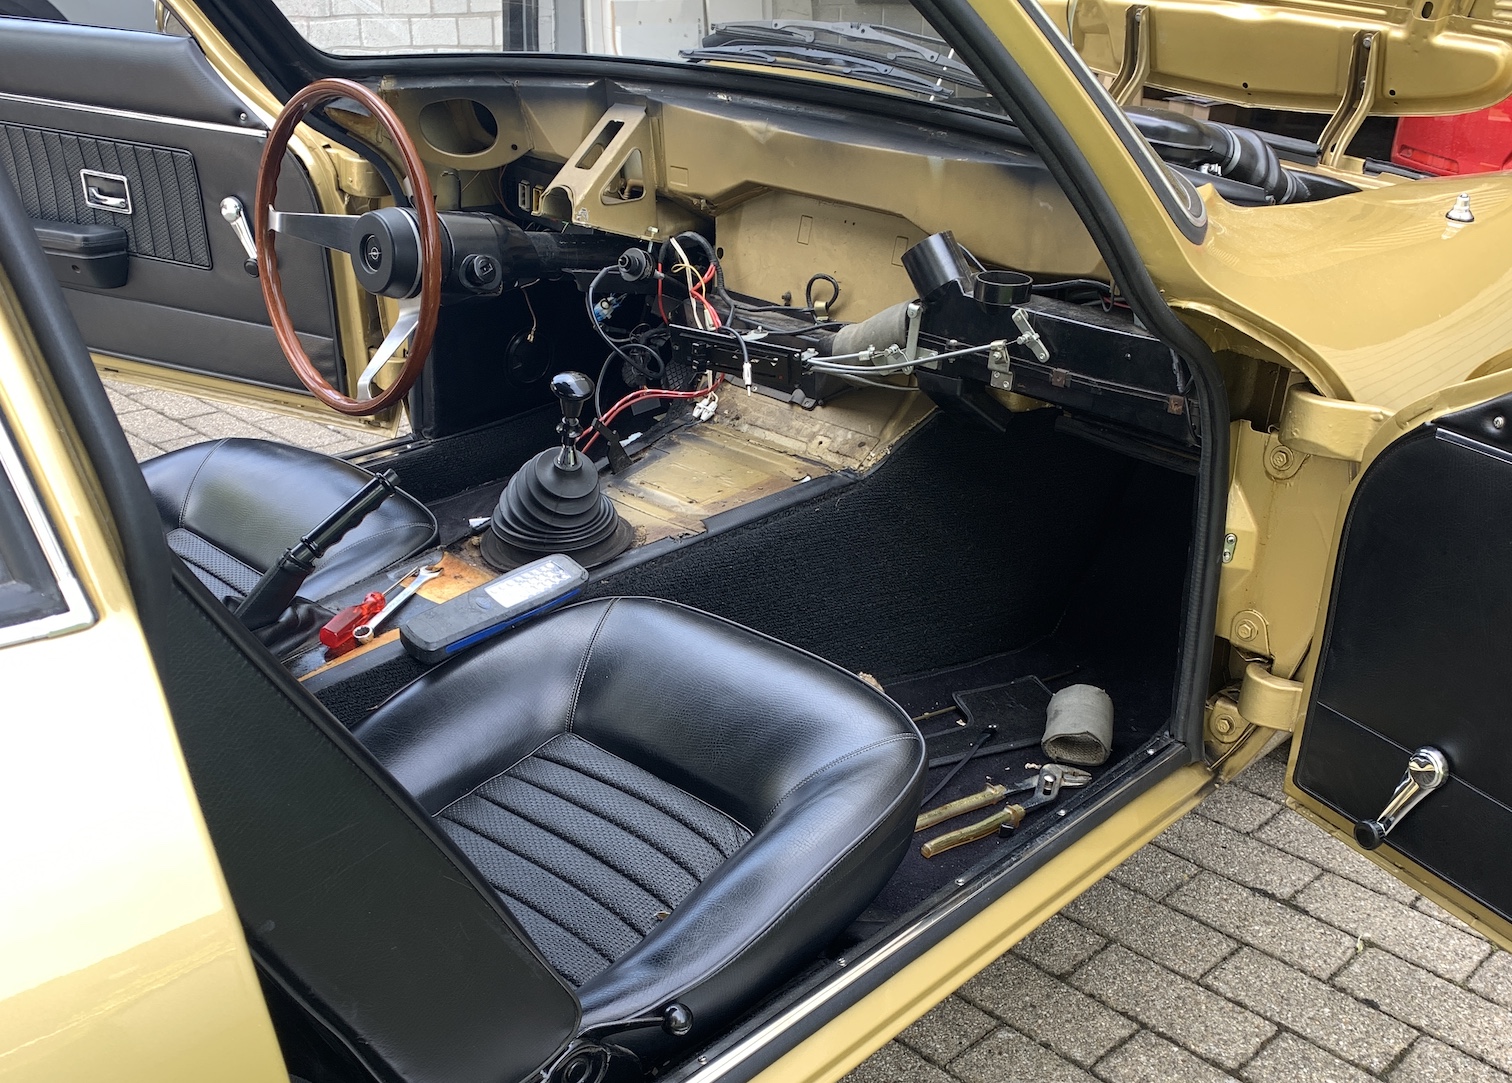
| Power steering |
|
I'm very happy with the power steering upgrade I've had installed in 2016. The installation was professionally done by EZ Power Steering in Leerdam, The Netherlands. It is fully electrical, so it doesn't rob any power. It makes the car easier to manoeuvre at slow speeds and makes the overall driving experience so much nicer. The amount of steering assistance is proportional with speed, with positive steering feeling all the time, just like a modern car! Nothing is visible under the hood, the unit is nicely concealed under the dashboard. A very neat installation in a tight space. Mind you, it is not cheap, but it is worth every penny! |
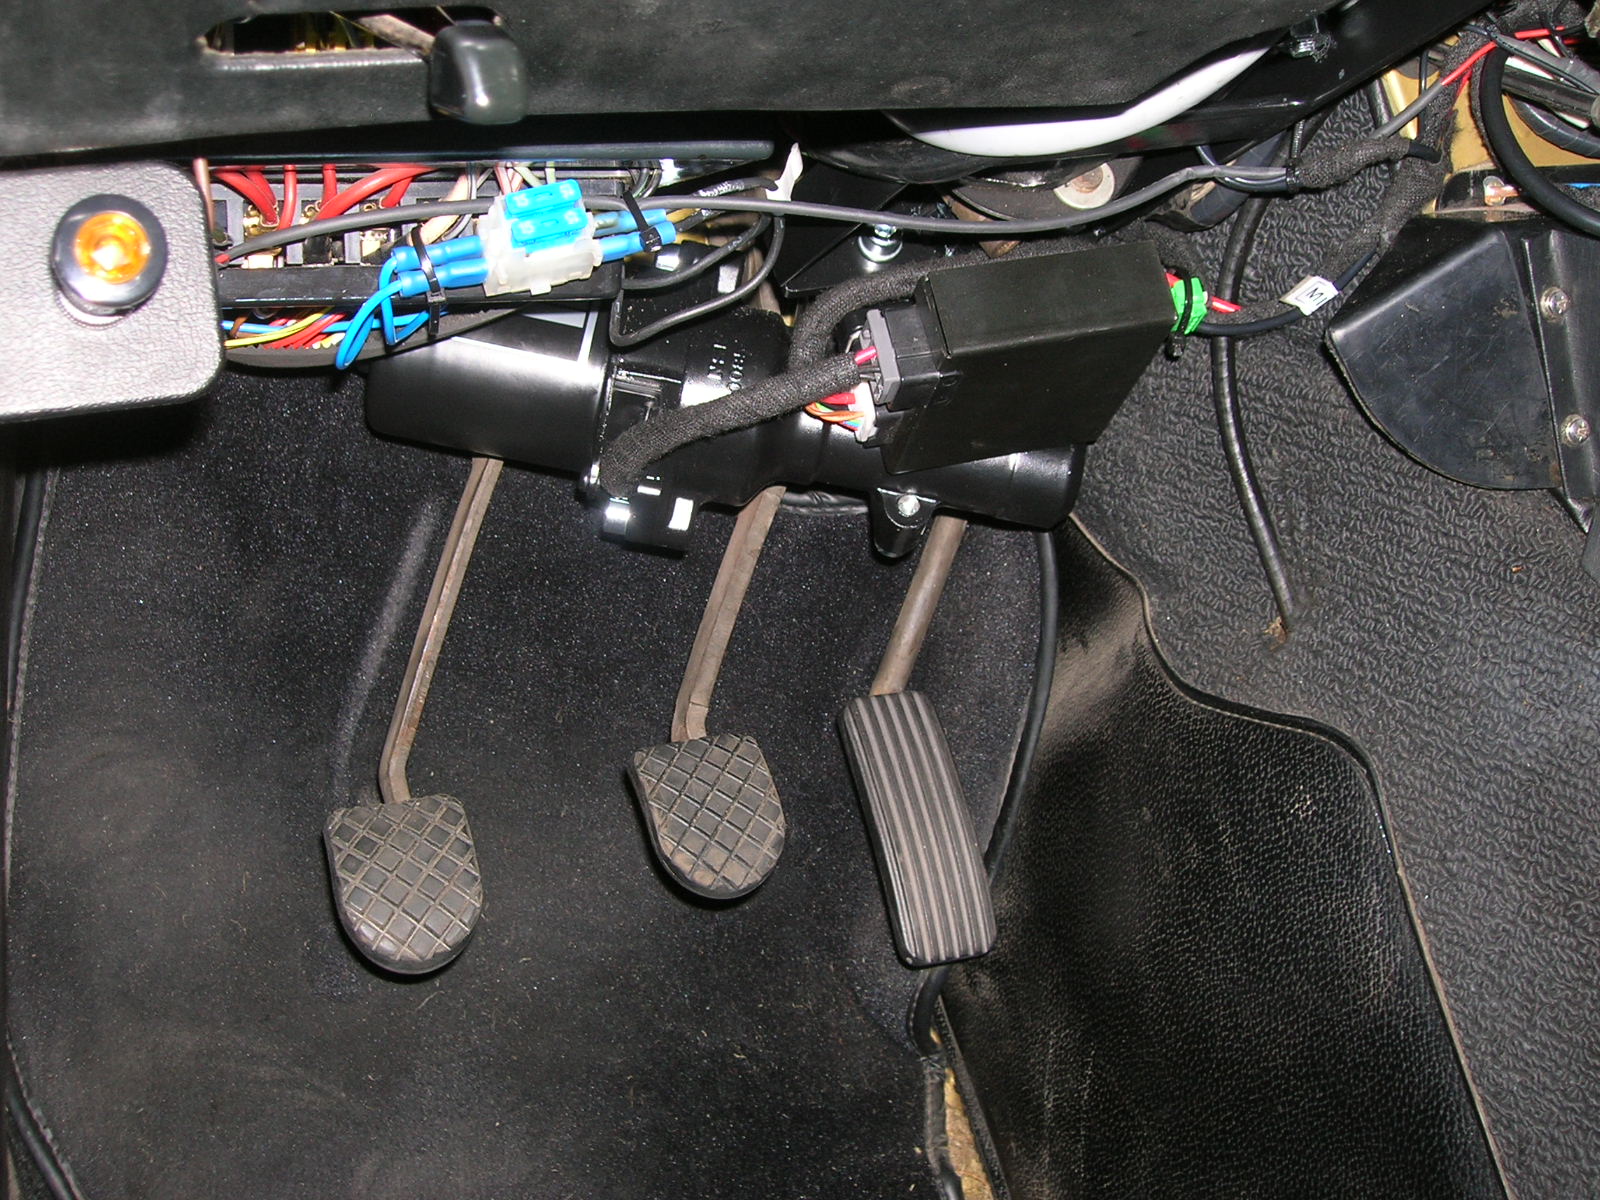 |
| power steering neatly installed under the dashboard |
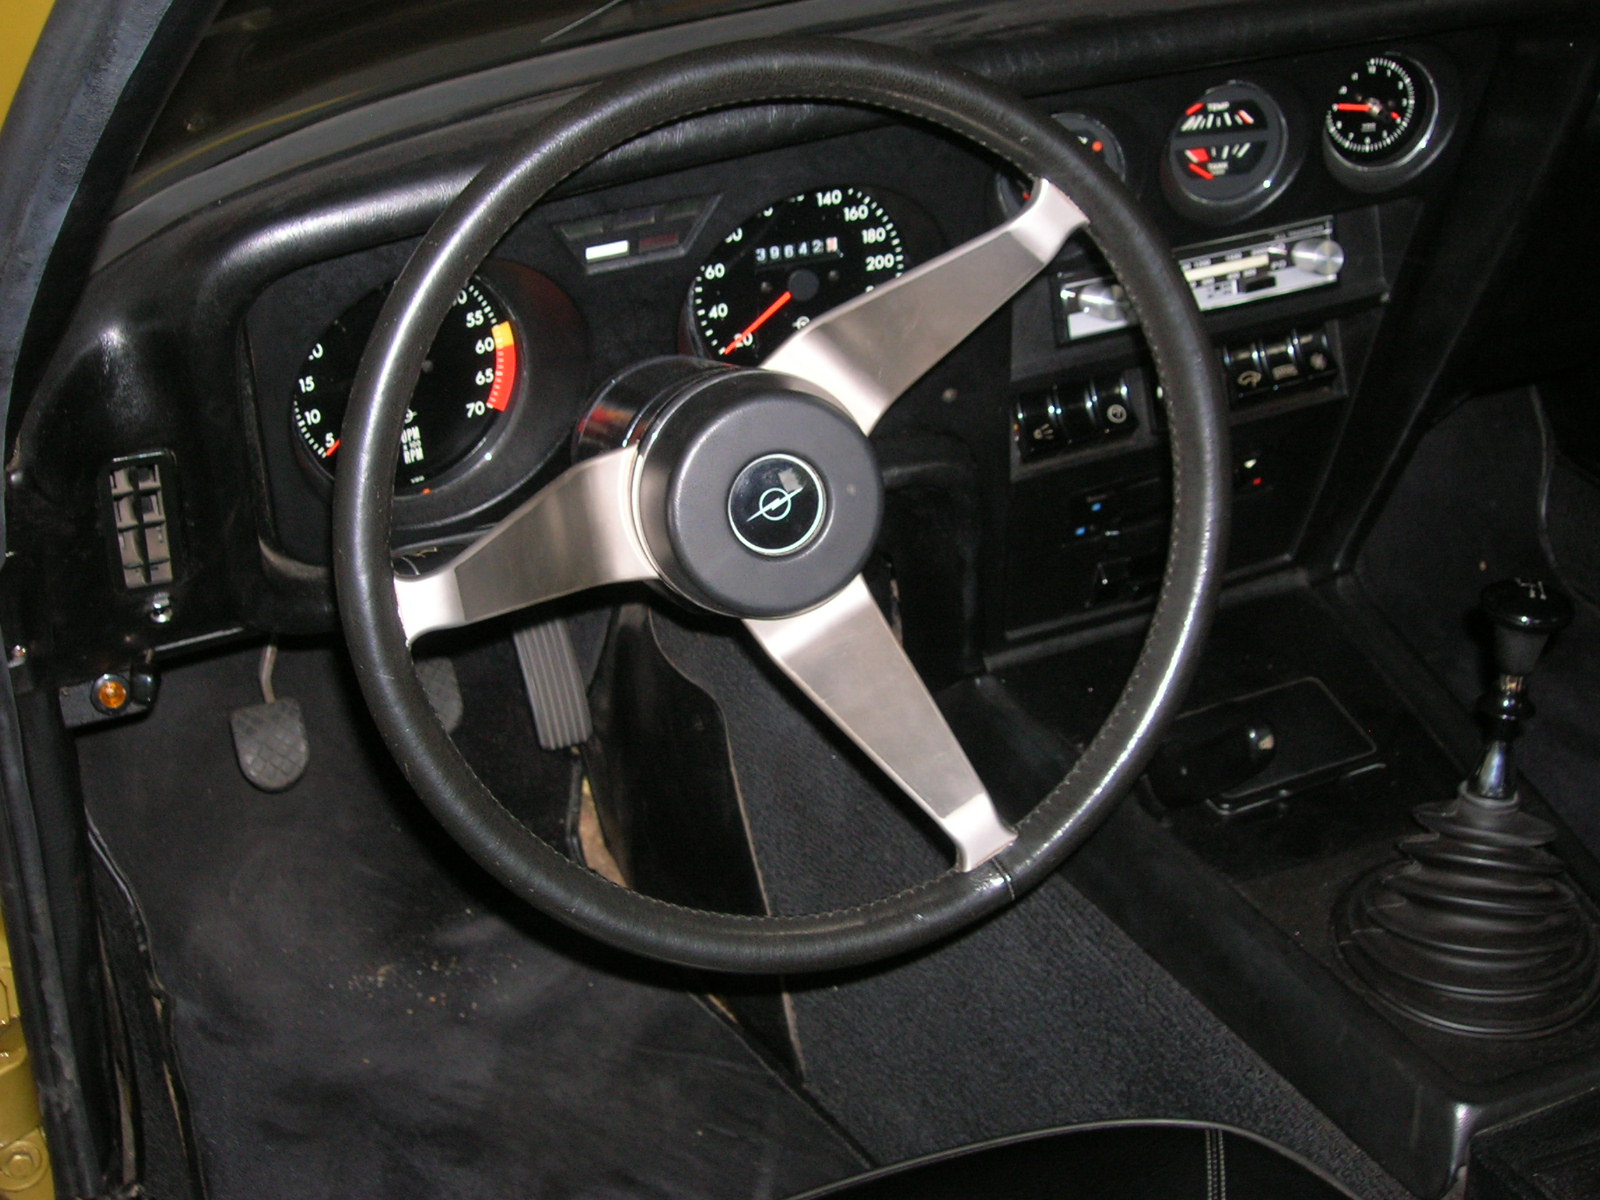
| New wooden steering wheel |
|
After the power steering upgrade, I installed a new wooden steering wheel to replace the original black "leather" steering wheel which was slowly deteriorating. The new true wooden steering wheel was bought from Opel GT Source (OGTS) in the USA, but nowadays, it's also available from Splendid Parts in Germany. The swap took me less than 15 minutes, following the OGTS online instructions. The look and feel of the (real) wood is just perfect for me. |
 |
| old "leather" steering wheel |
 |
| new wooden steering wheel |
| New horns |
|
The original horns were worn out. One horn would bring out only a very modest deep sound, the other horn nothing at all. As a safety measure, I replaced both horns with aftermarket horns from Conrad: one high tone, one low tone, but wired to be operated simultaneously. The horns were astonishingly cheap. Fitting them took me somewhat more than half an hour and would certainly have been more easy if the car had been lifted of the ground. They produce a decent sound and make me feel safer in traffic... |
 |
| new horns fitted on both sides (one side shown) |
| Auch, mouse nest in the heater box! |
|
When I retrieved the car from the 2025-2026 winter storage, I was met with an awful smell inside. I needed the car for a photoshoot with my elder grandson, so there was little time for a thorough investigation. A few days later, I took the time to tackle the challenging job. It required the lowering of the steering wheel column, the removal of the centre console, the instrument panel and the dashboard, and the removal of the heater valve in the engine bay before the heater box could be accessed to finally find the cause of that awful smell.
a lot needs to be removed before gaining access to the heater box (passenger's side) Upon opening the heater box after removal, I was greeted with a dense nest containing a few dead mice in various states of decomposition and a lot of excrements... |
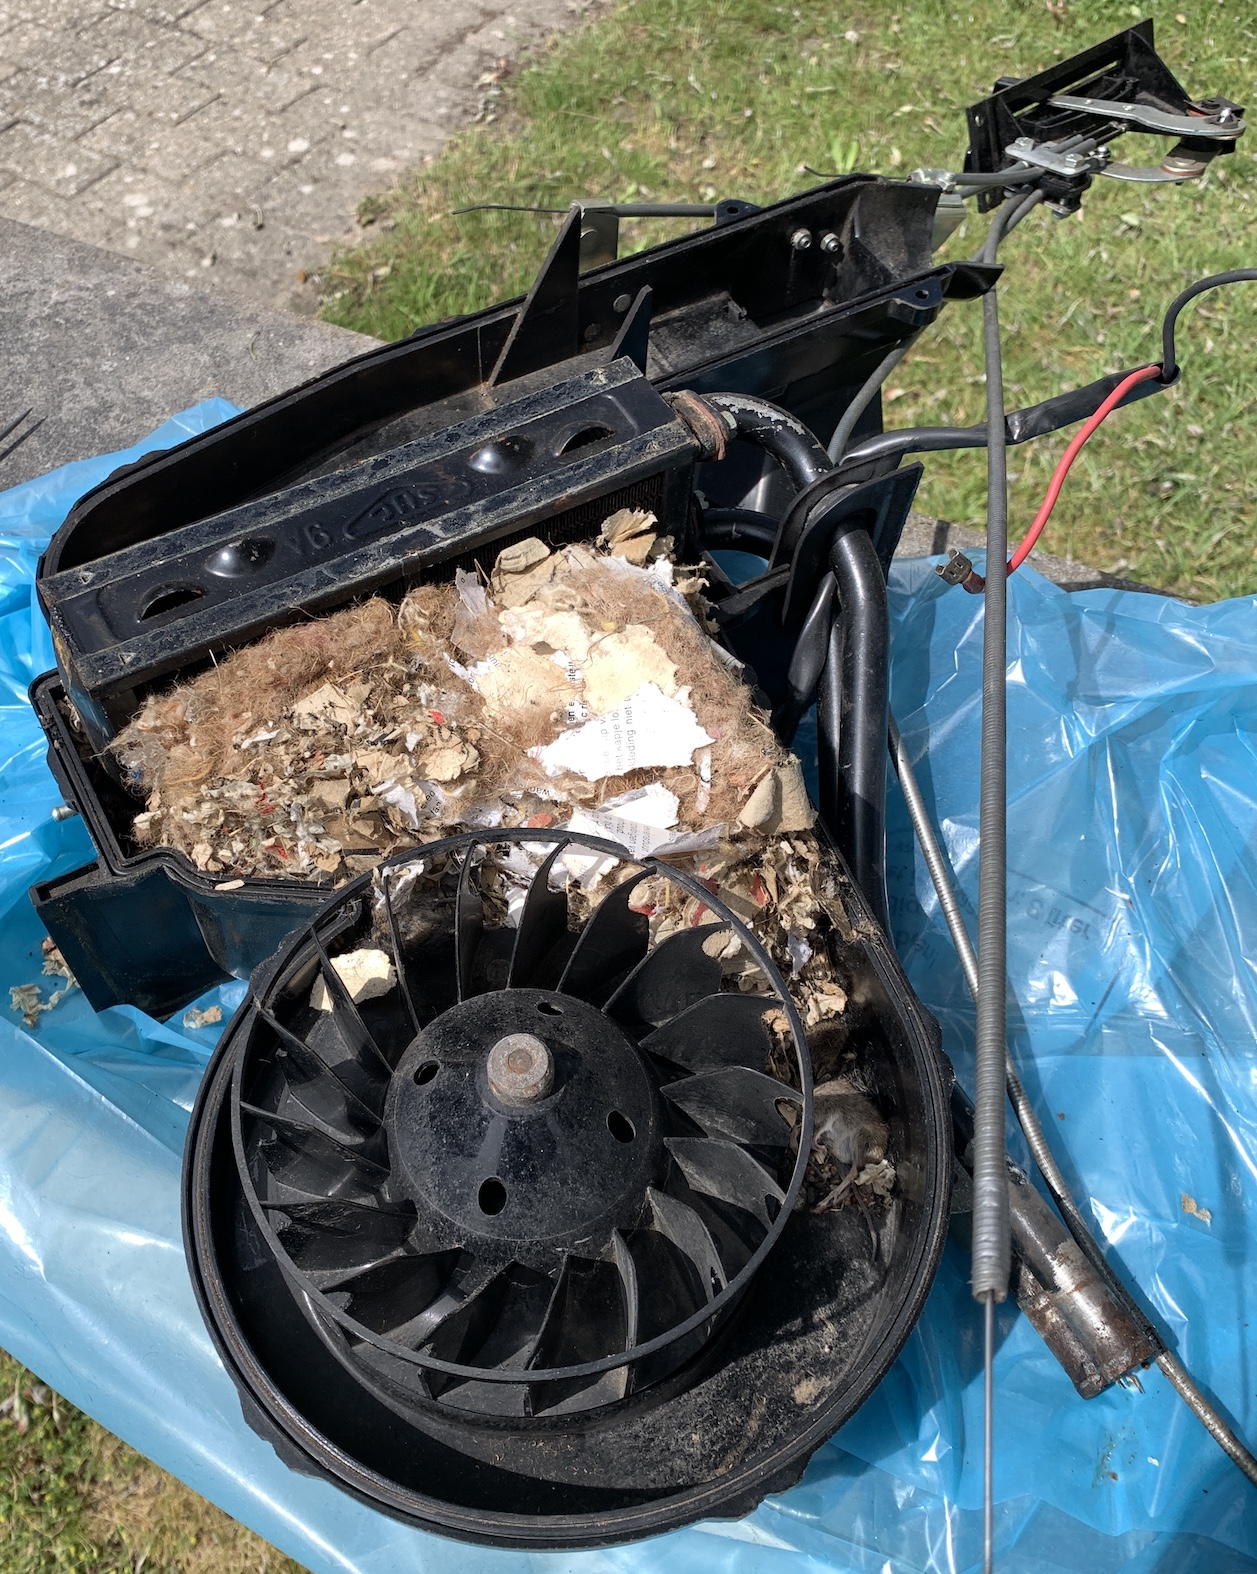
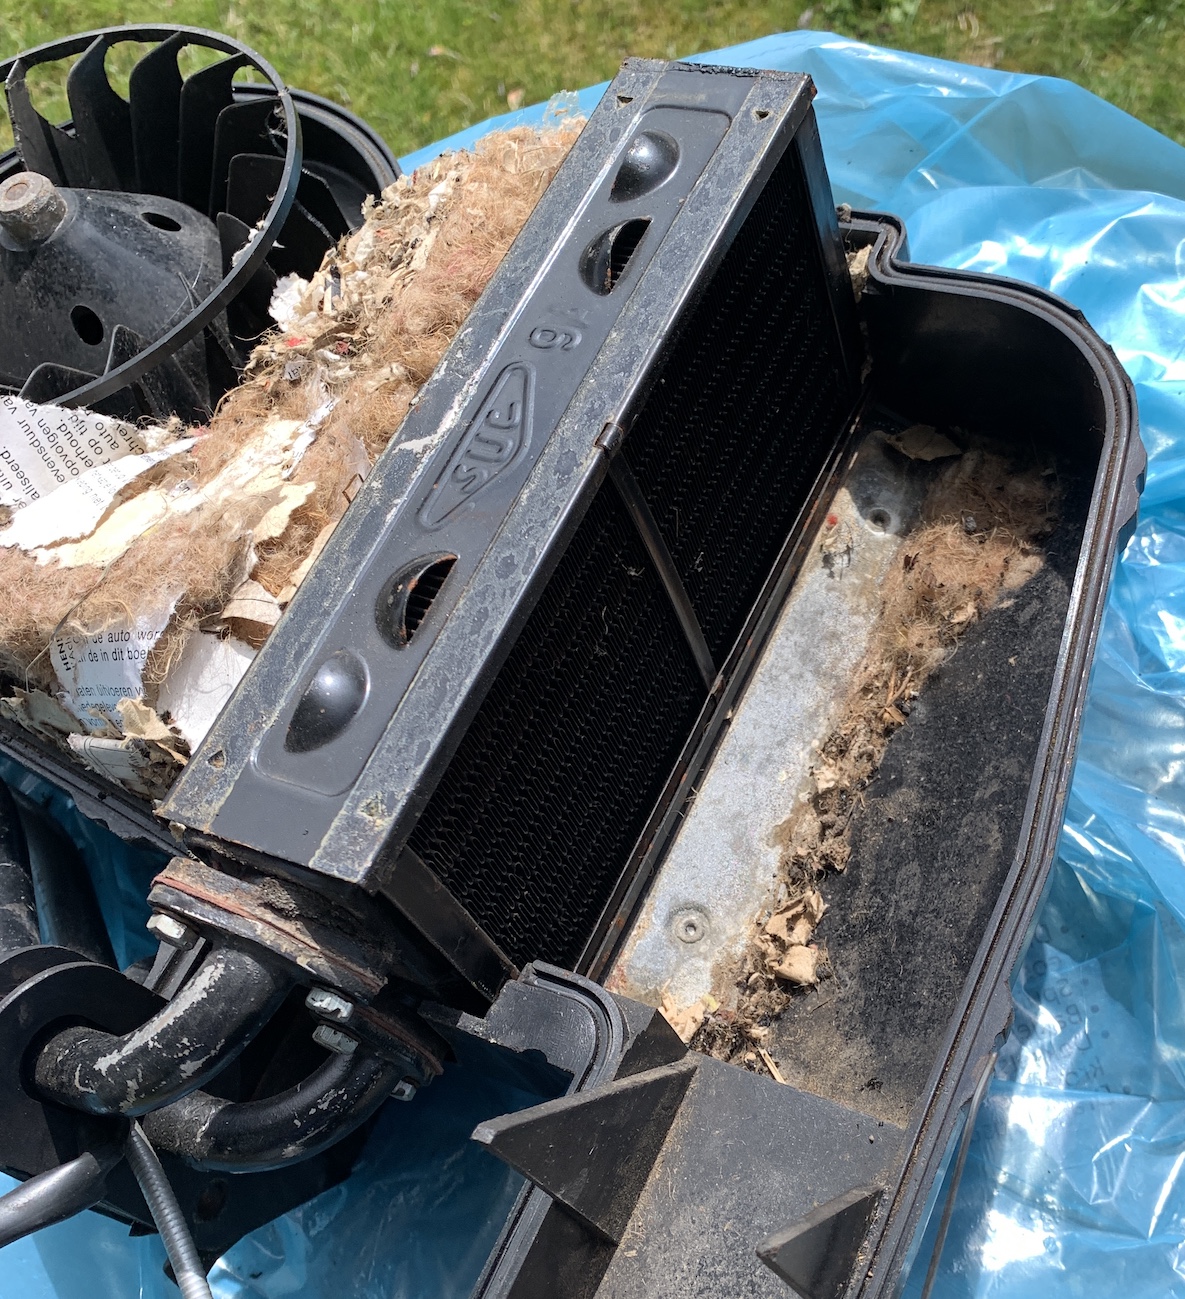
nest with dead mice in heater box |
|
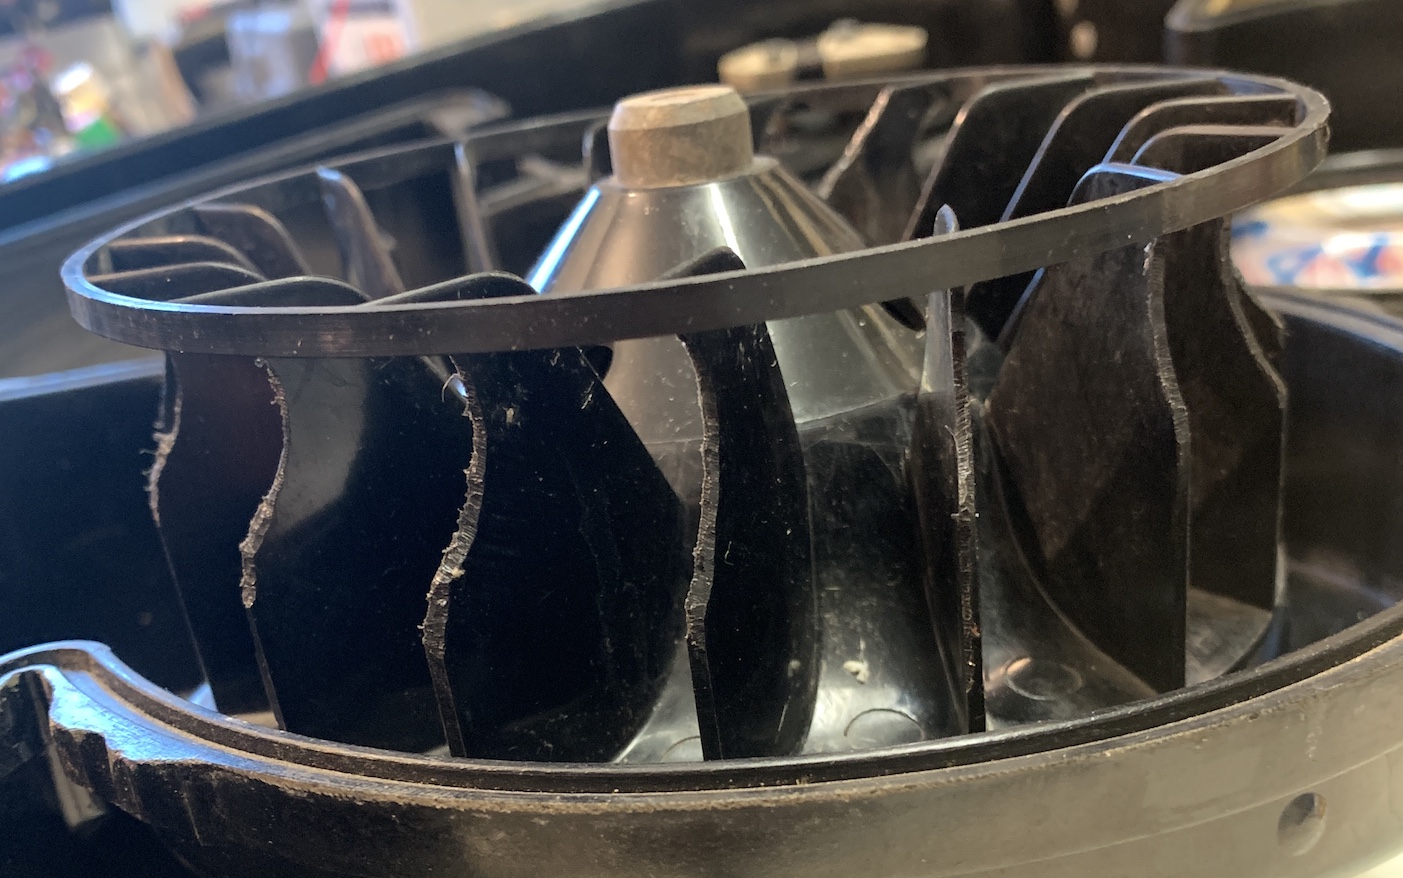
I cleaned the heater box and discovered some damage on the blower fan. Fortunately, I found a replacement in Germany on a second hand site which I then installed before closing up the heater box.
this damaged blower fan was replaced with a good one Excrements from the mice were also found in the felt air ducts, so I was forced to toss these and order new ones (as the nasty smell would never go away). While the instrument panel and dashboard were removed from the car, I took the opportunity to tackle a few other repair jobs like adjusting the clock, repairing the odometer mounts, installing a new aluminium glove box, installing new neoprene seals on 4 air vents, installing a new aluminium heater control panel, installing a new heater valve in the engine bay etc.
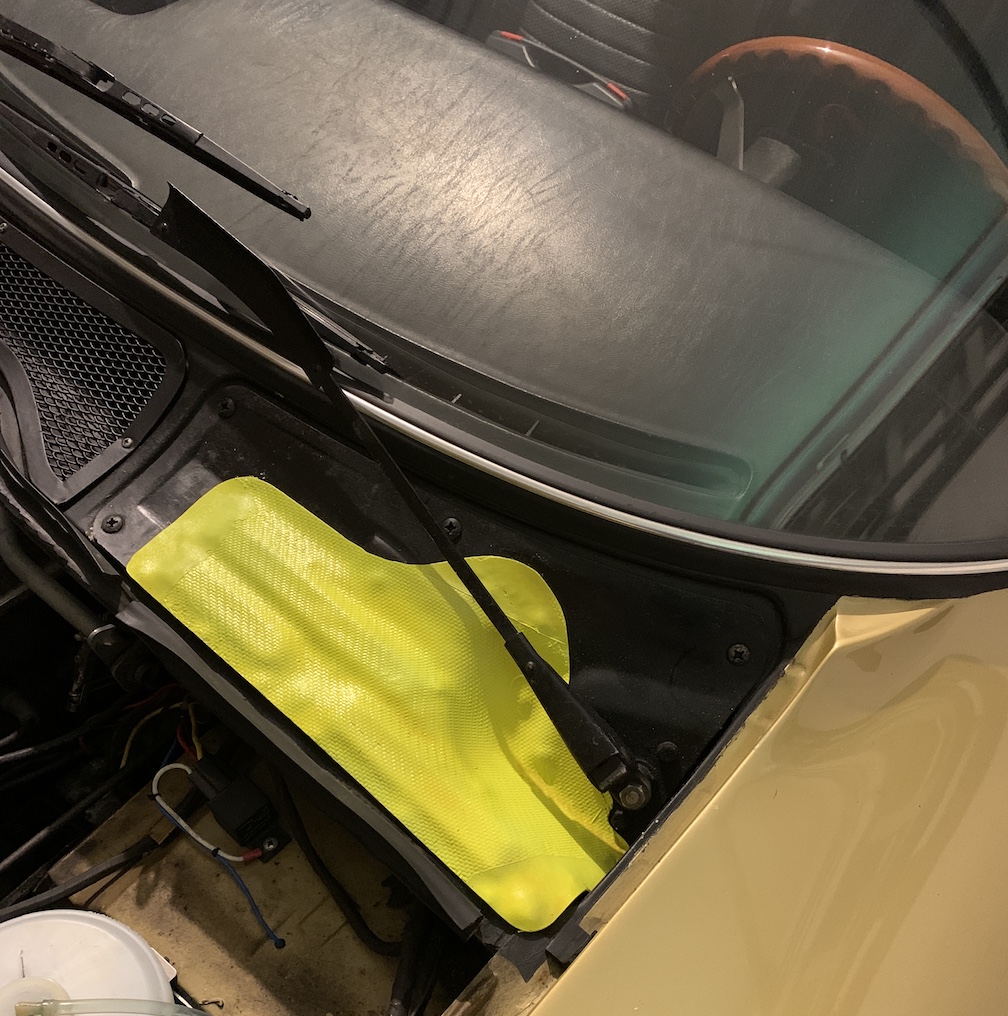
new stronger aluminium heater control panel in the front (original fragile plastic in the back) Of course, I did take measures to avoid mice in the future. I made covers to close off all the possible access holes on the outside just below the windshield. I read that mice need little more than 6 mm. The removable covers are intended for storage only, it's probably not advisable to drive with them. They were laid up with epoxy and fibreglass cloth to match the respective car parts, and are held in place with strong magnets. I painted them in dayglow yellow, to remind me of taking them off before driving the car.
this magnetic cover closes all the slots on the wiper motor mount, the most likely route for mice to get to the heater box
this small magnetic cover closes a small water drain hole which might offer access for small mice As an additional measure, I installed a grill on the heater box. This was CAD drawn and CNC cut from fibreglass board of 1.5 mm thickness. It was subsequently painted black before installation on the air intke of the heater box. The grill does not noticably affect the volume of air. Furthermore, I will install an ultrasonic rodent repeller under the hood. And finally, my winter shutdown checklist will include the closing of all vents. Hopefully, I'll never have to cope with mice again in the future...
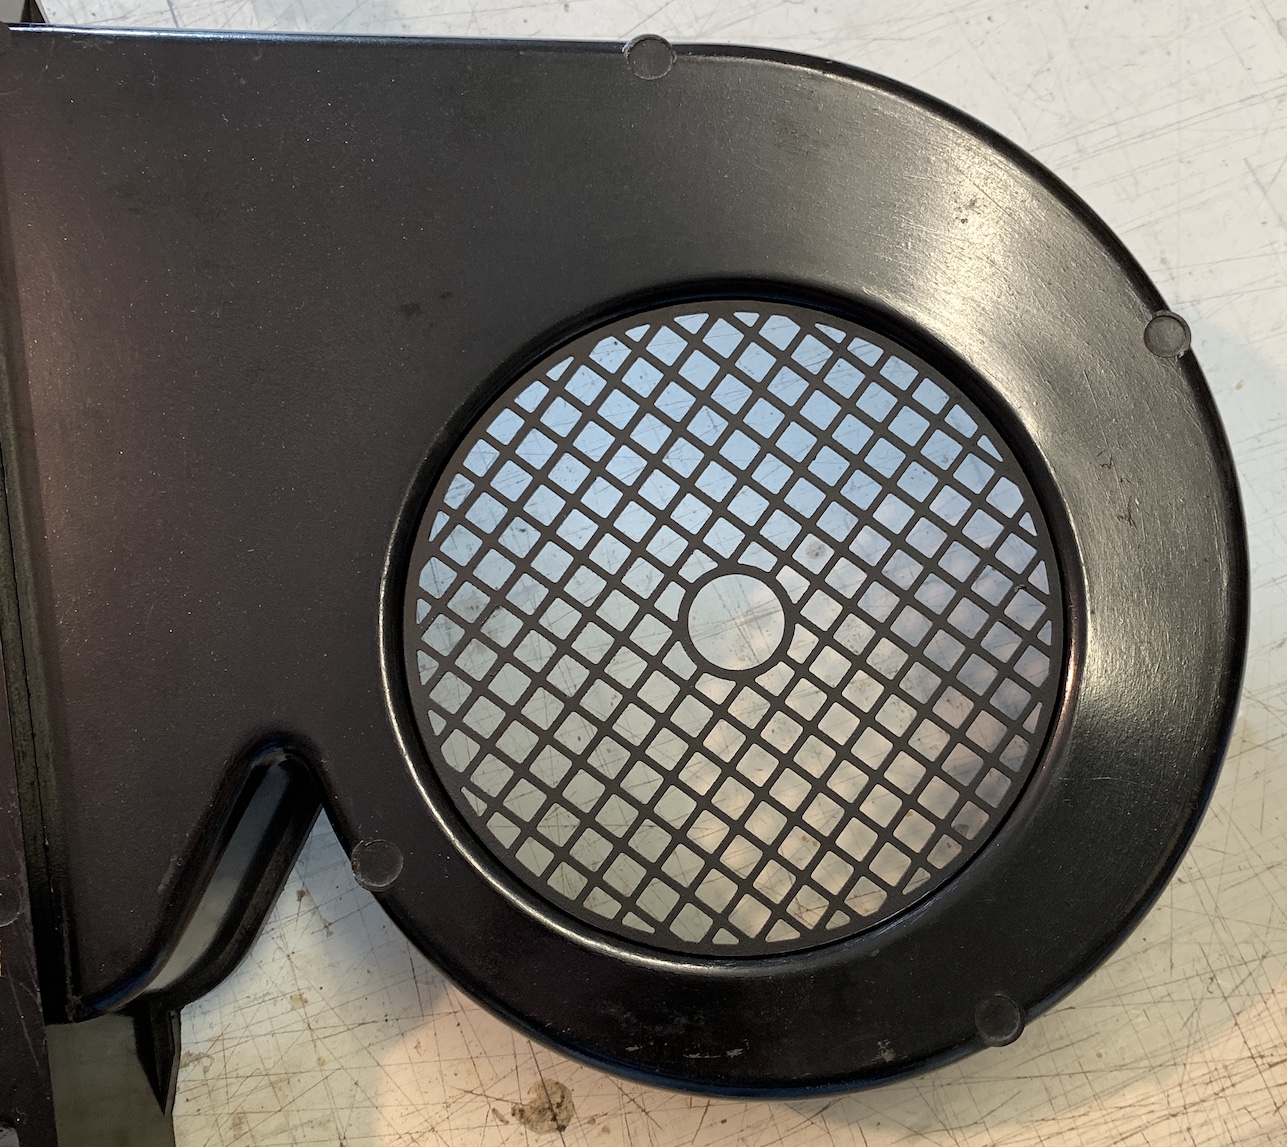
grill on the heater box air intake to keep mice out
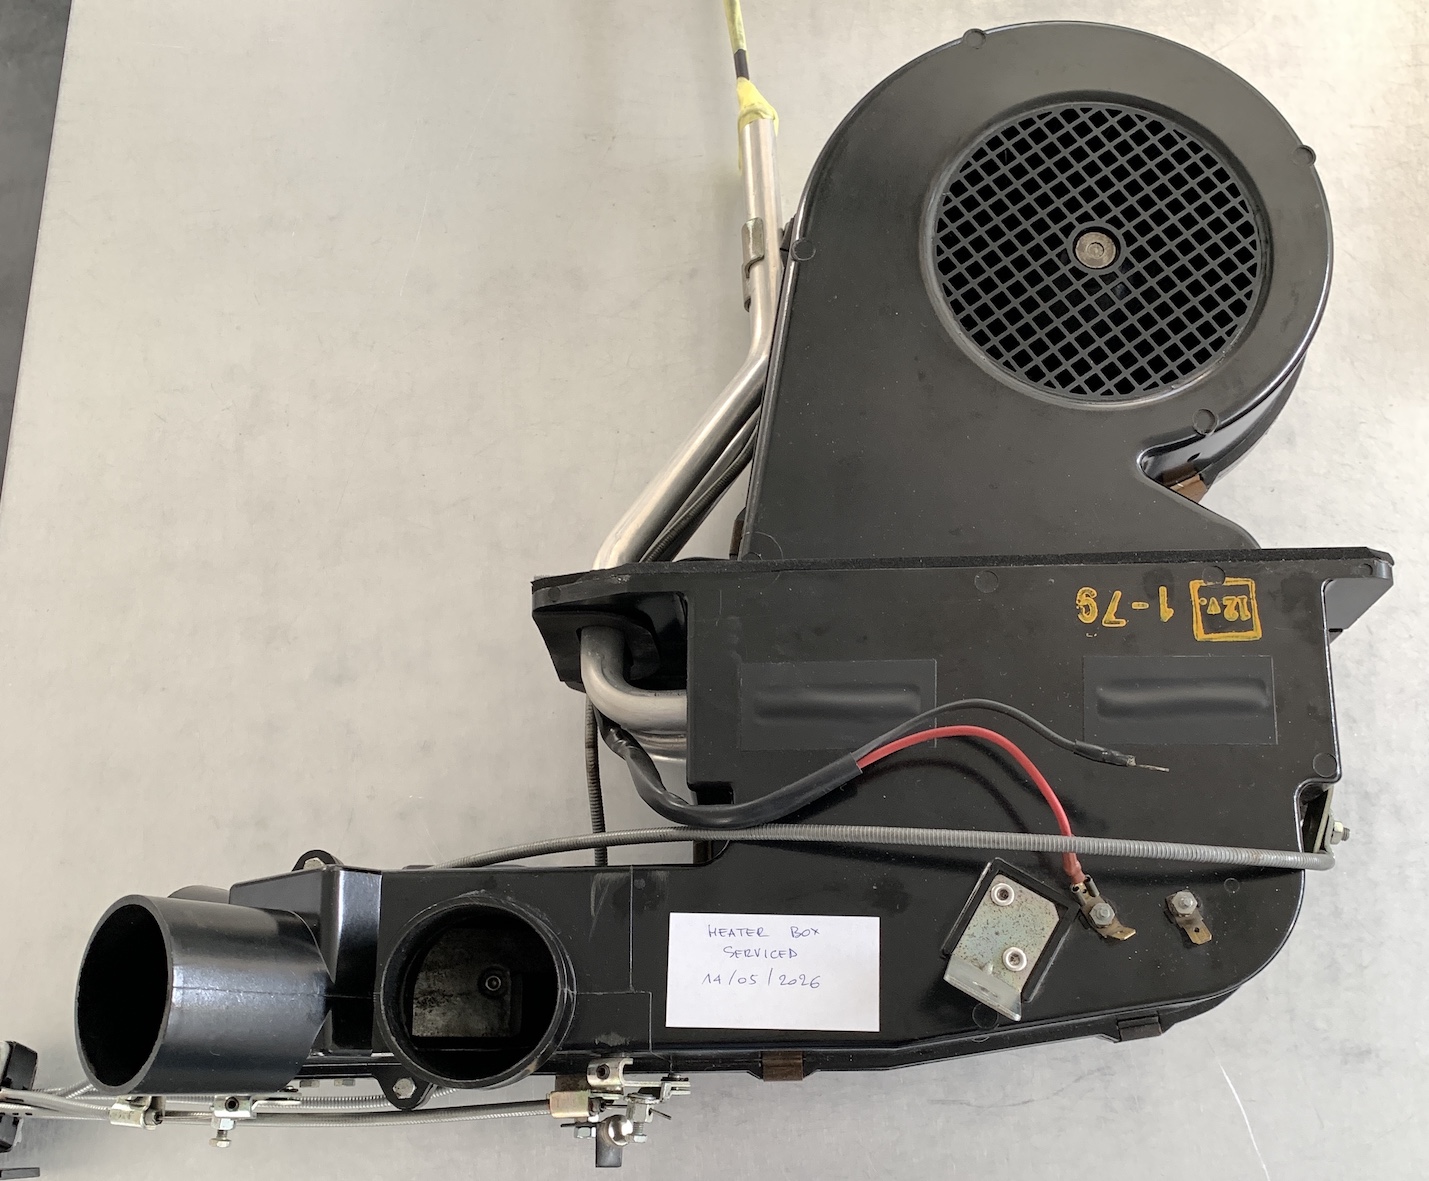
heater box fully serviced, ready for installation in the car
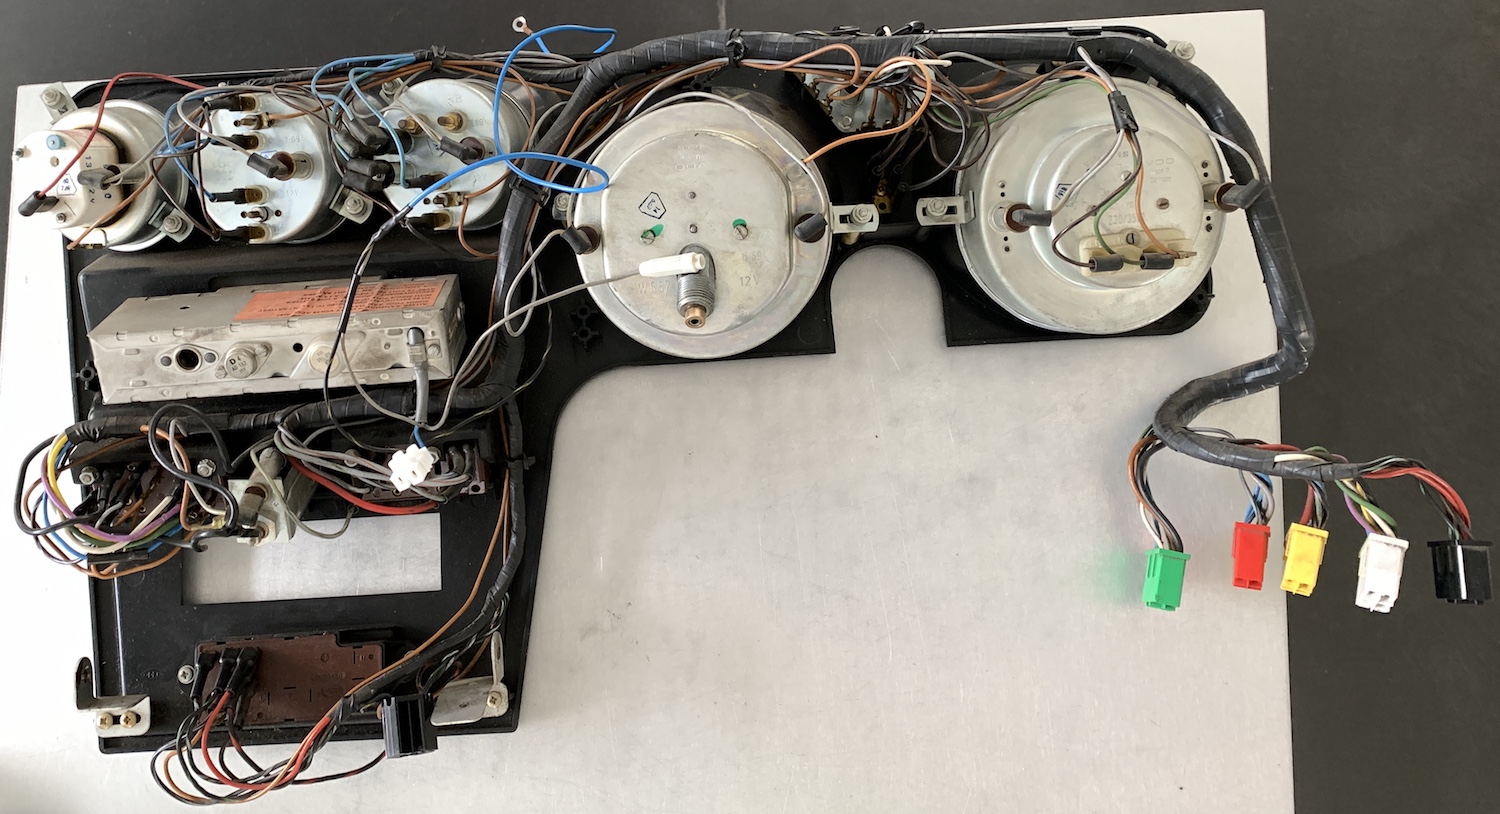
backside of the instrument cluster, allowing the clock to be adjusted (top left)
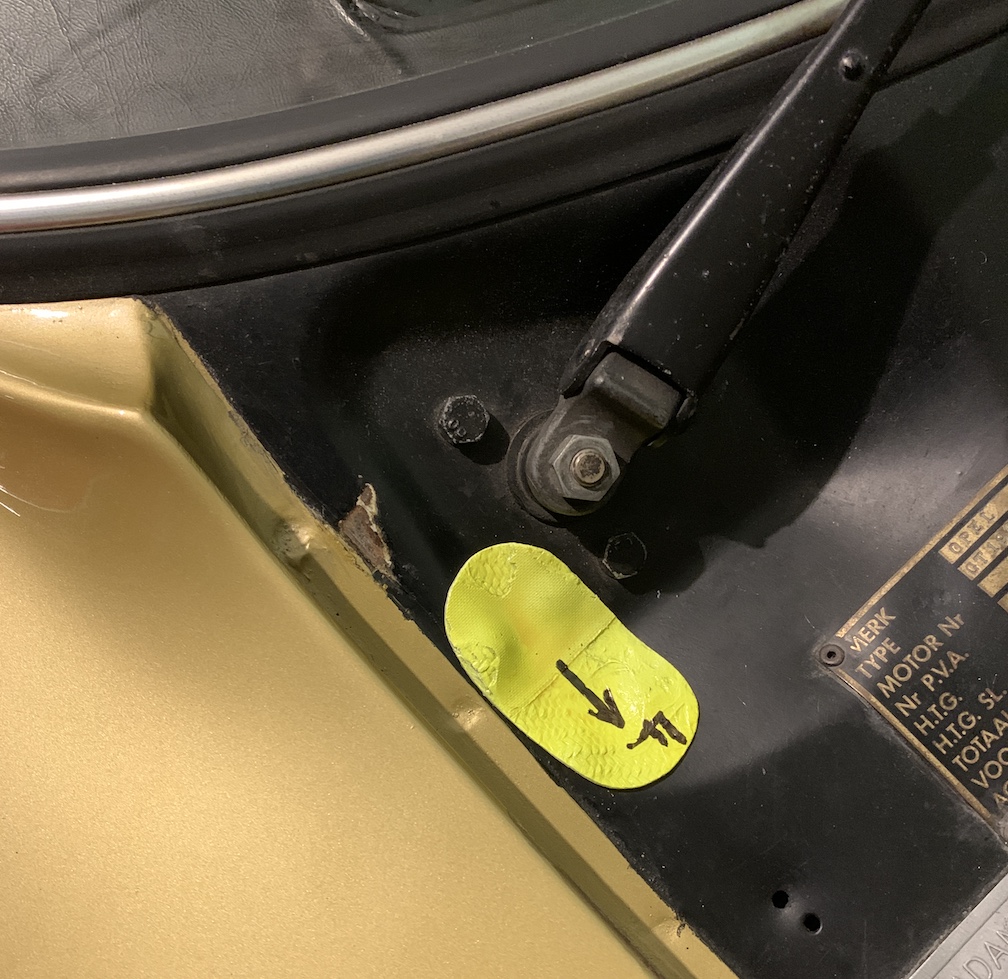
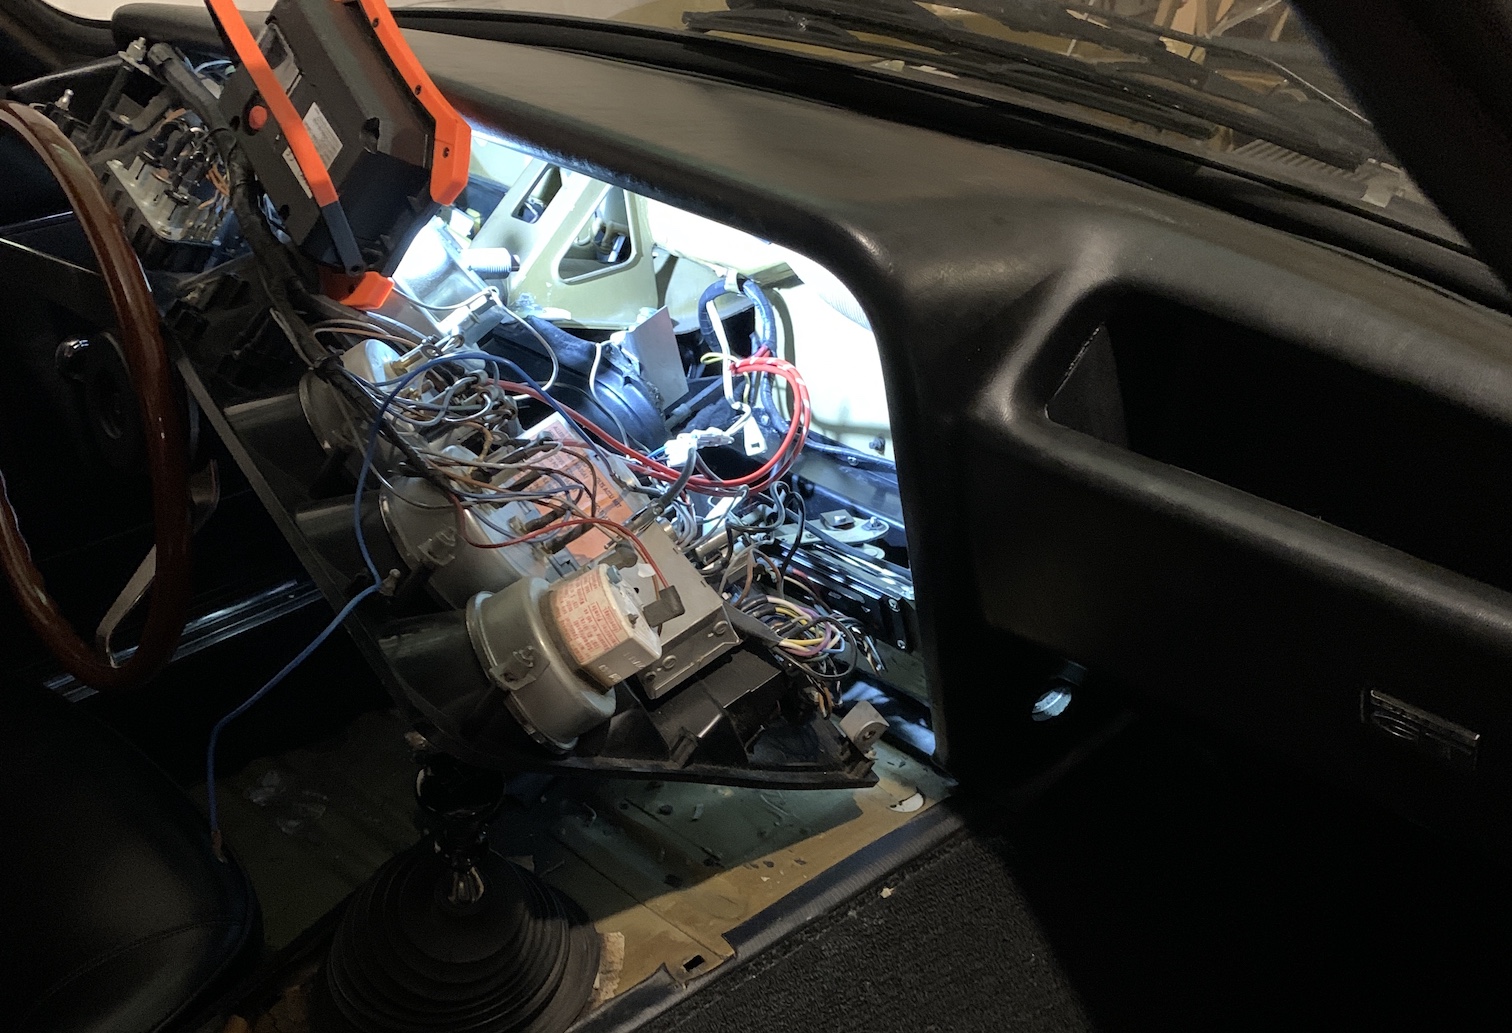
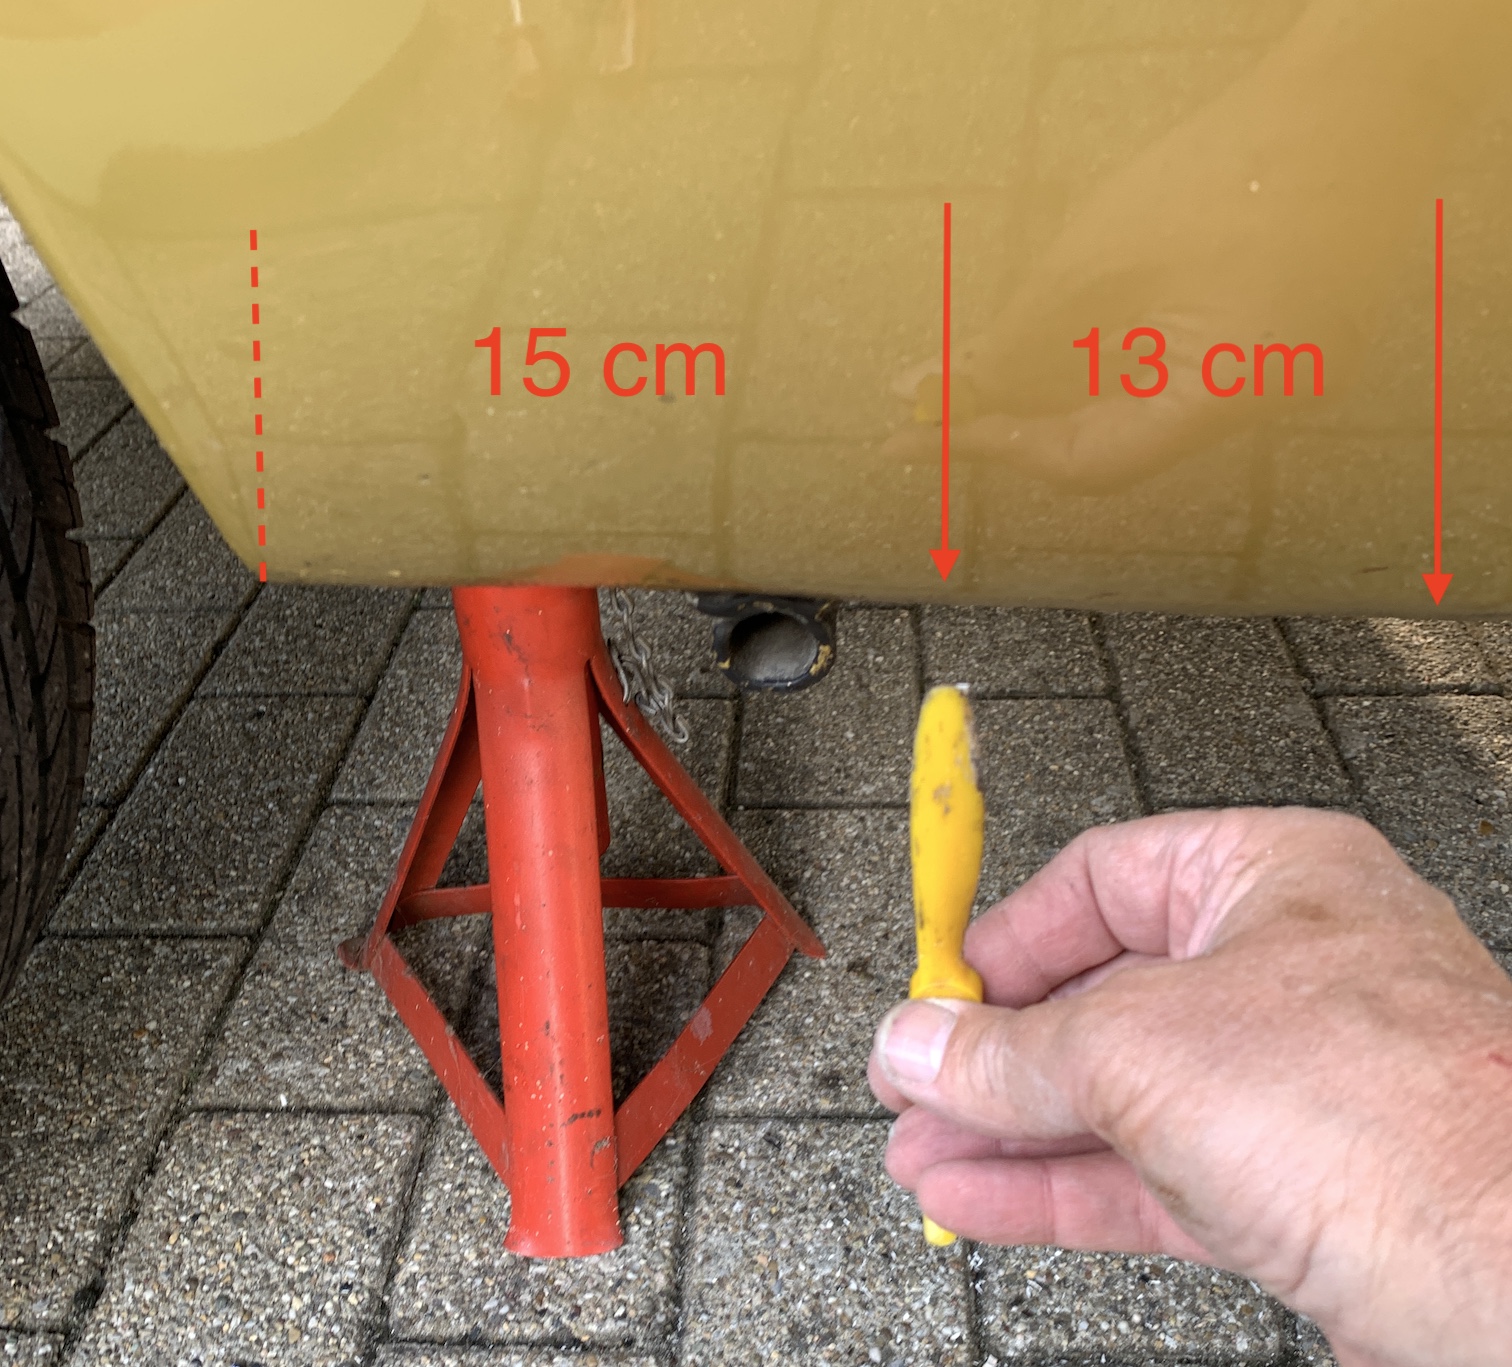
heater box and dashboard are installed, now in the process of installing the instrument panel, taking care not to forget any electrical connections... I tackled another problem I wasn't aware of before. Apparantly, the drain holes on the bottom of the hollow sections right behind the front wheel arches were all clogged except one. These need to be free to prevent water accumulating inside the hollow section and cause rust. I opened up these holes with a spare nylon propeller blade of one of my models and took the opportunity to apply a wax inside with a special tube on a spray can (Motip Hollow Section Wax). This gives me peace of mind to avoid rust in this sensitive area. Below is a photograph indicating the location of the drain holes.
arrows indicate the two drain holes on the left hand side (I use a nylon propeller to free them)
|
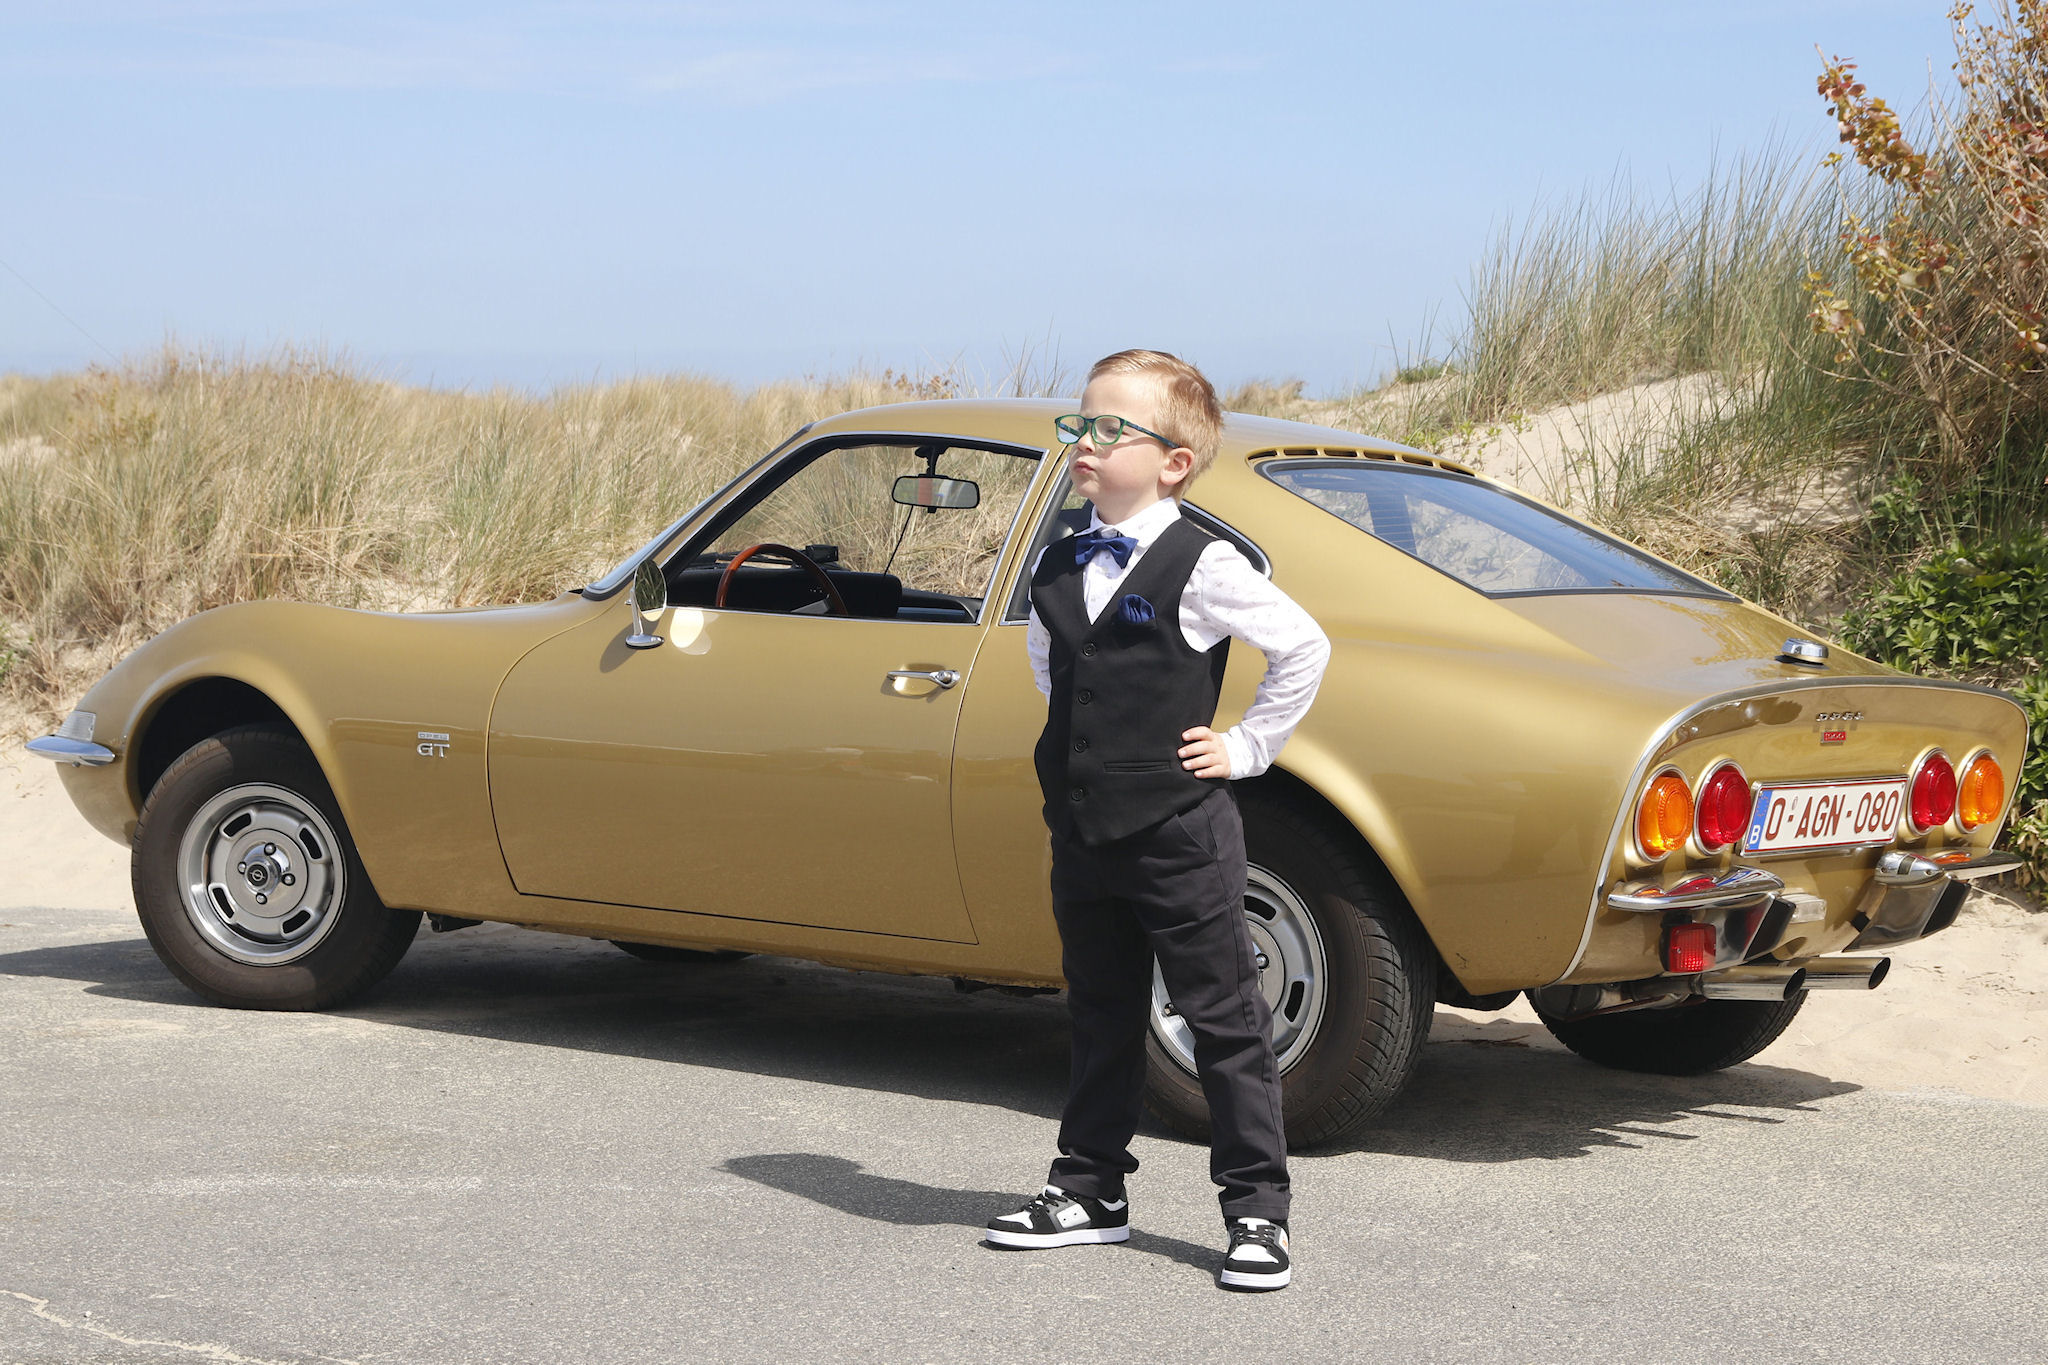
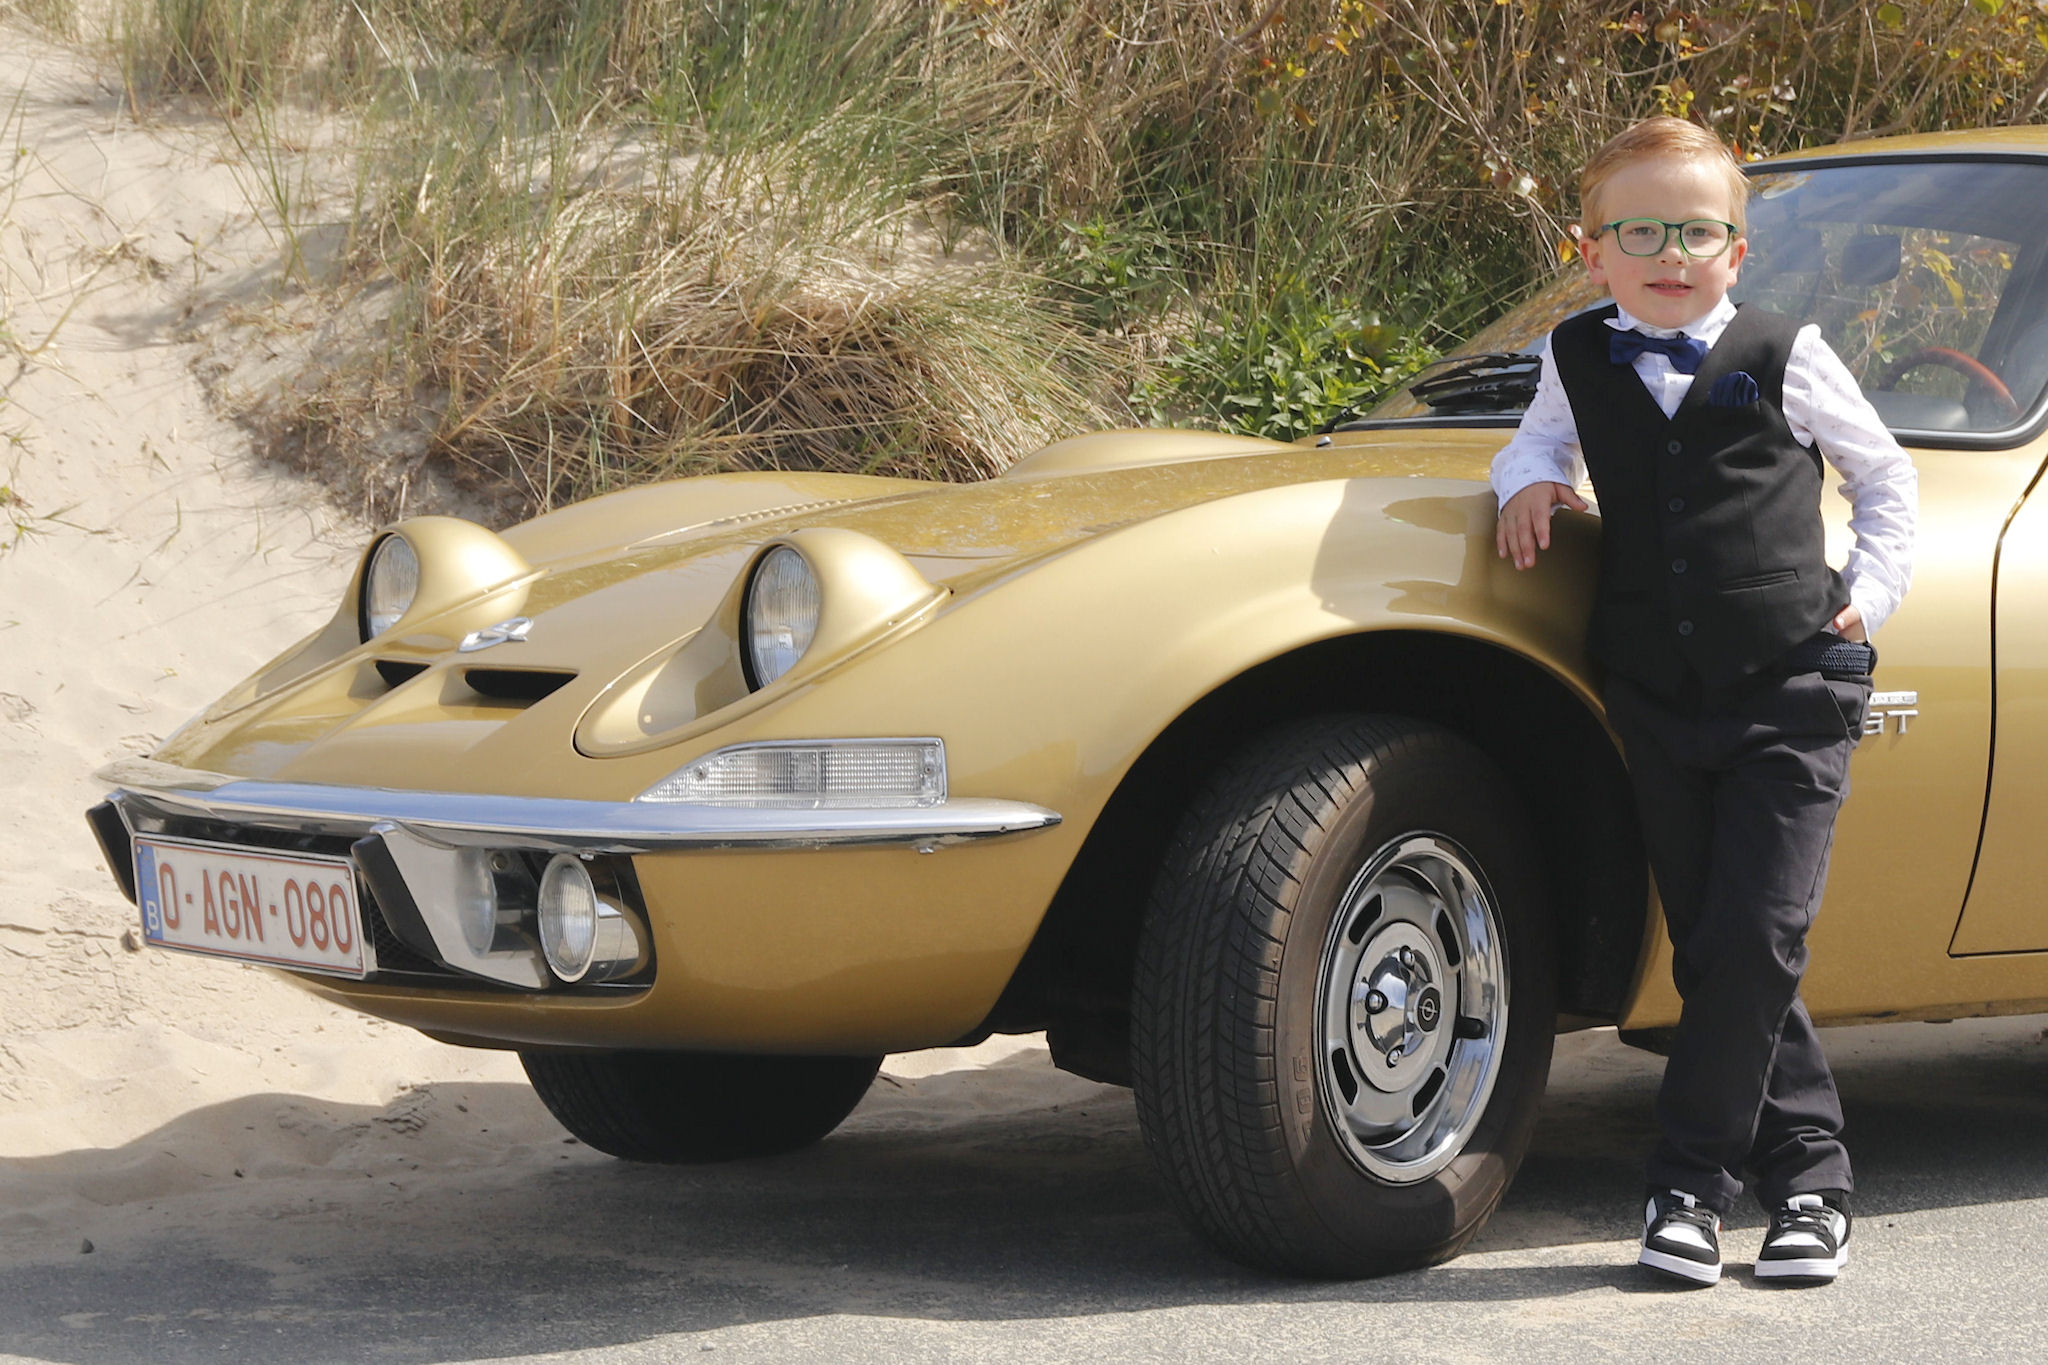
| Photoshoot with my elder grandson |
|
My son Michel made some nice photographs of my Opel GT with my grandson Rik. See a selection of these photographs below.
With my grandson Rik in James Bond style |
| Belgian Opel GT Club |
|
I joined the Belgian Opel GT Club in April 2006. It is quite alive with a website, a published newsletter and a very active members core. The best thing is that the club is a member of the BEHVA allowing affordable full insurance of the car. From time to time, I participate at events hosted or supported by the club, as can be seen below. |
| 4de Oud Opel Treffen Oudenburg 2006 |
|
This is the first event we drove to in the GT. The event was open for all old Opel cars but at the same time, a dedicated GT get together between the Belgian and the Dutch GT Club was held. It was well organised and we had a good time, despite the rain. We will certainly go back next year! Here are some photographs. |
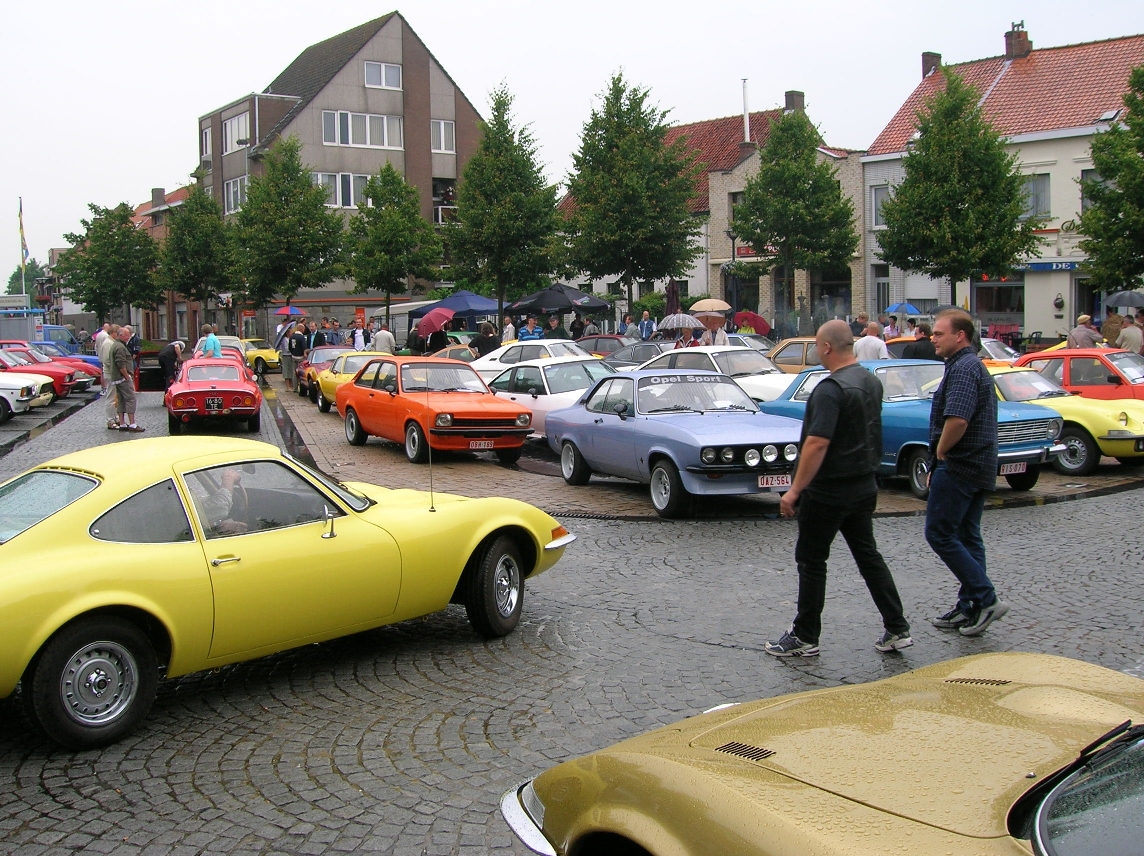 |
| old Opels gathered on the Oudenburg market place... |
 |
| ...with the majority being Opel GT's |
| Belgian Opel GT Club Spring 2007 meeting in Ostend |
|
This event was the opening of the 2007 Belgian Opel GT Club season kindly organised by Rudy Marlein from Ostend. A total of 23 Opel GT cars participated, all from Belgium. The weather was exceptionally fine, so we enjoyed this meeting which was held in a very relaxed atmosphere. I wish to thank Rudy for his effort. I also wish to thank him and the other club members for their spontaneous help during my coolant spill problem... I joined in at the first stop of the tour with my son Bert. He made the following photographs. |
 |
| First stop at Domein Walrave in Raversijde |
 |
| Still at Domein Walrave |
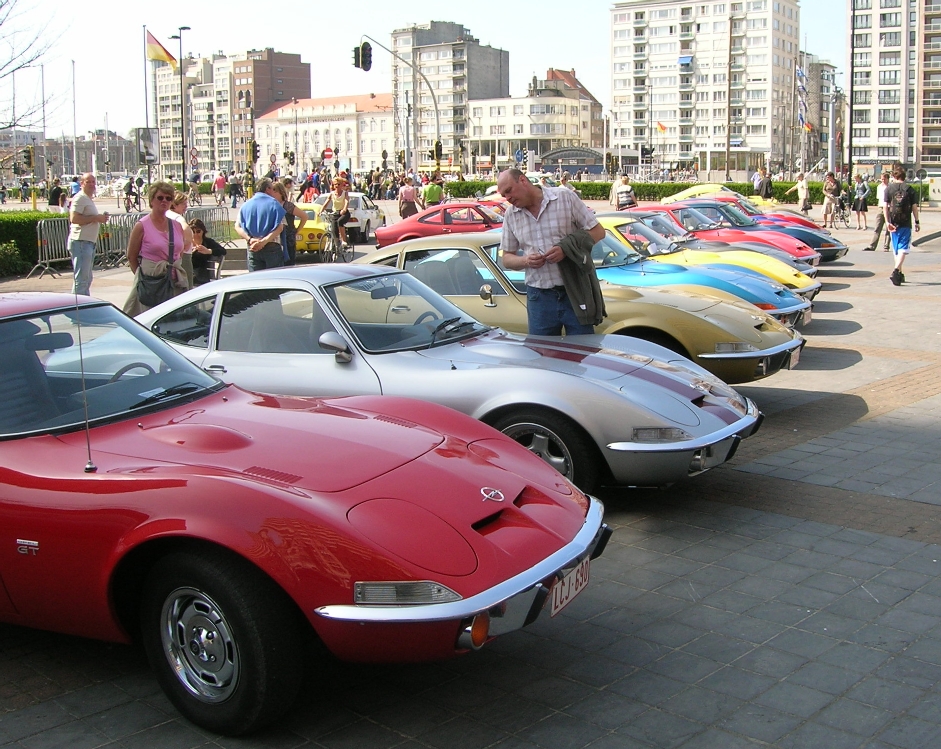 |
| Second stop in Ostend City |
 |
| Line up of GT's shot from another angle |
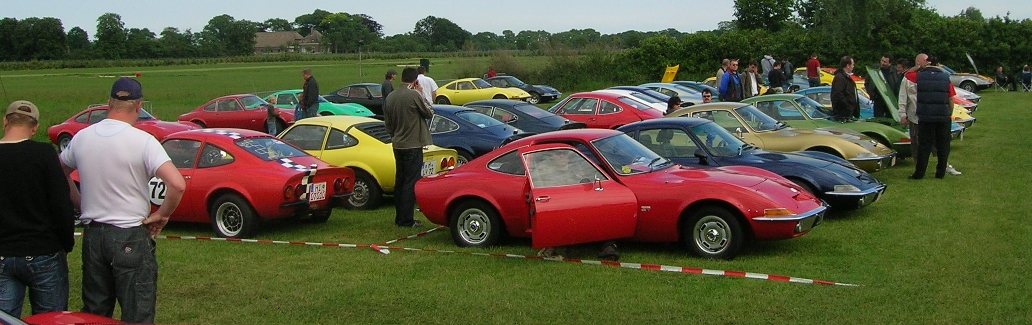
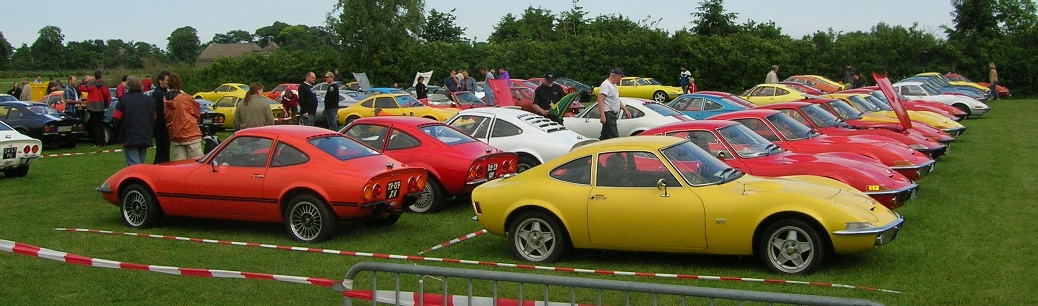
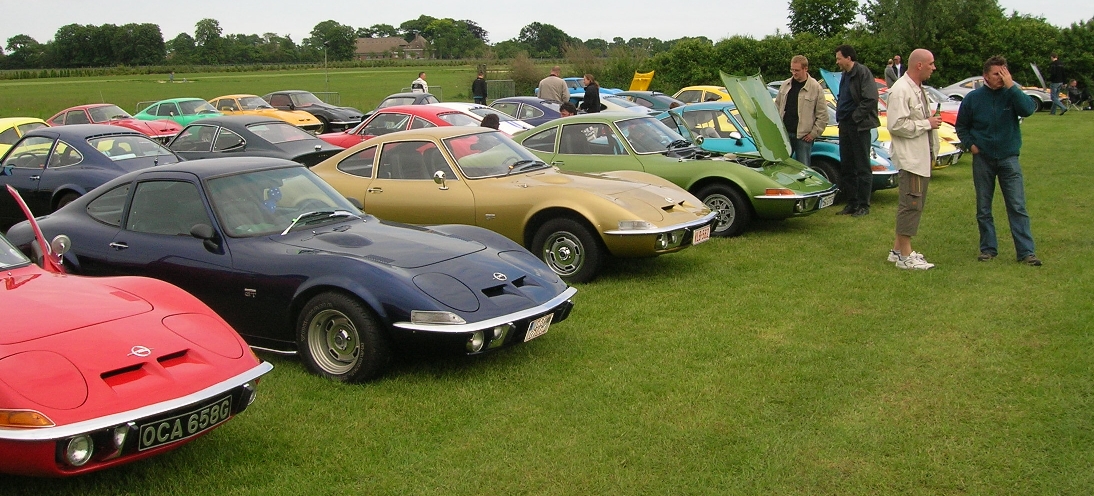
| Opel GT Eurotreffen Slagharen (NL) 2007 |
|
Over 200 GT's attended the event during the course of the weekend. I drove my GT to Slagharen in the company of my son Bert. We could only stay for one day and that was: saturday. The weather was poor at the start of our 400 km onward trip with quite some rain but improved as we progressed north. The trip went very well indeed. The car received a well deserved tune up by a local Opel GT expert just a few weeks before and it did really pay off: the engine now ran like a Swiss watch with excellent fuel economy. Thanks a lot Geert! Upon arrival, it was clear that the terrain had seen lots of rain during the night before but it turned out to be of no concern. We parked the car and spent some time looking at the line up of other GT's. Of course, we also strolled through the trade stands looking for parts to improve our own GT. |
 |
 |
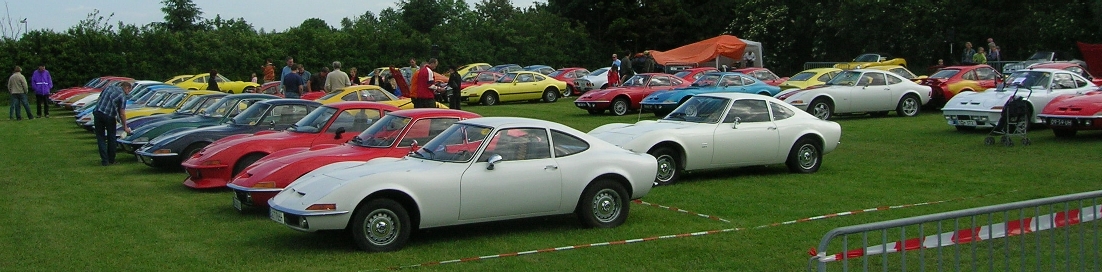 |
| part of the line up of GT's on saturday |
|
I prefer the Opel GT in its original state but some of the customized examples are really interesting. |
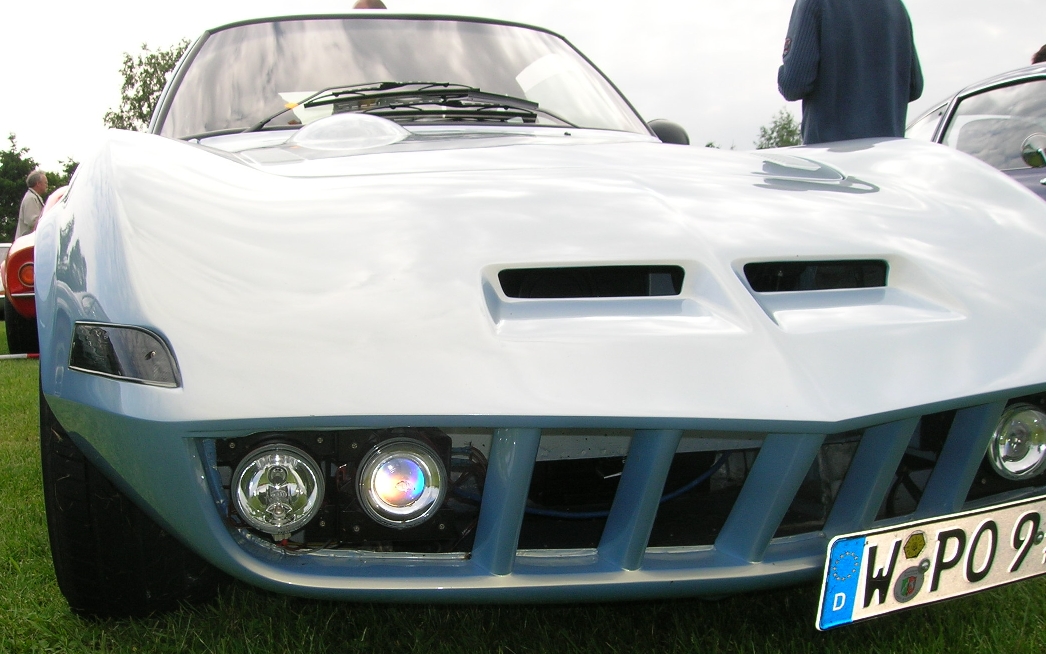 |
| customized front end |
|
Some of the engine compartments have to be seen to be believed. Absolutely speckless with lots of chromed parts. Quite some devoted owners! |
 |
 |
| some examples of extremely neat engine compartments |
 |
| my own Gold GT parked between some other fine examples |
|
We spent some more time at the attraction park and drove back to a Hotel some 30 km on the way home. We drove the remaining 370 km home on sunday morning. In all, the event was well organised and we enjoyed our trip! |
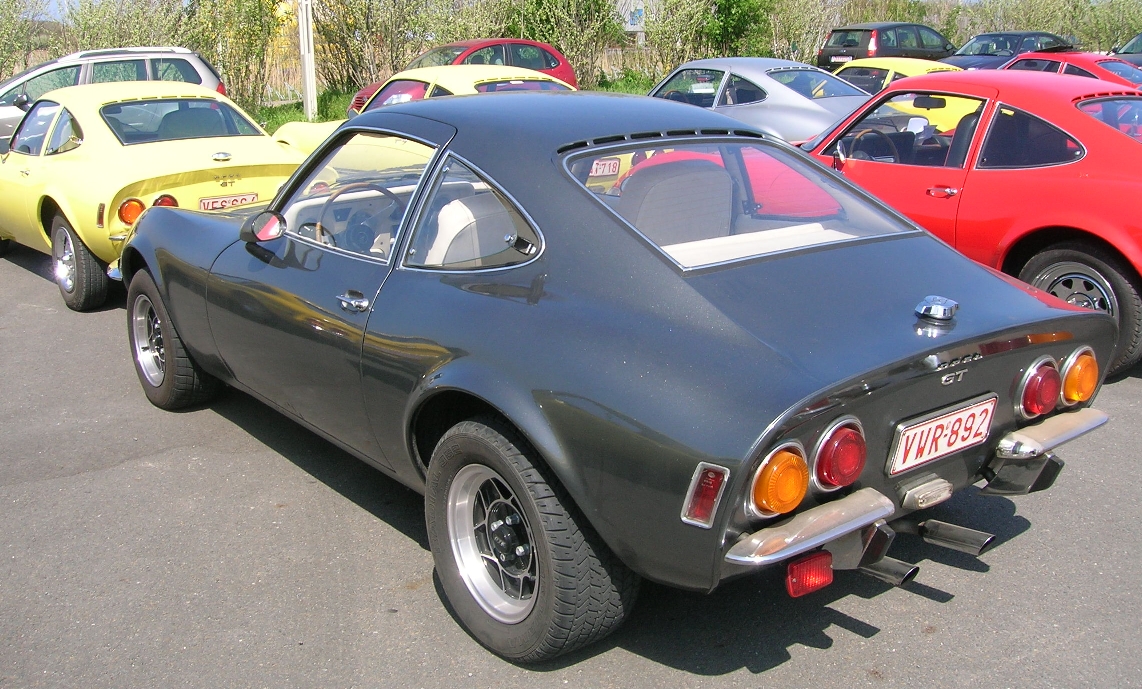
| Some facts about the Opel GT in general |
| Versions |
|
There were several versions of the Opel GT. Initially, you had two engine sizes with corresponding equipment levels. The smaller 1100 cc with 60 HP and reduced equipment level and the bigger 1900 cc with (initially) 90 HP with a more luxurious equipment level. Of the GT 1100, only slightly over 3.500 were made and production stopped quite soon as the majority wanted the more powerful and luxurious GT 1900. This means the GT 1100 version is quite rare. The rest of the production (some 100.000) was equipped with the 1900 cc engine. Initially, only as the most luxurious GT and later as the GT/J (GT junior). The GT/J was always powered with the 1900 engine and had some rejuvenating cosmetic changes: nearly all chrome was replaced with matt black, it was less luxuriously equipped and the car was only available in a reduced number of colours. Sideline stickers helped to accentuate the more sporty look which had to appeal younger potential buyers. Some 10.000 of these were made. |
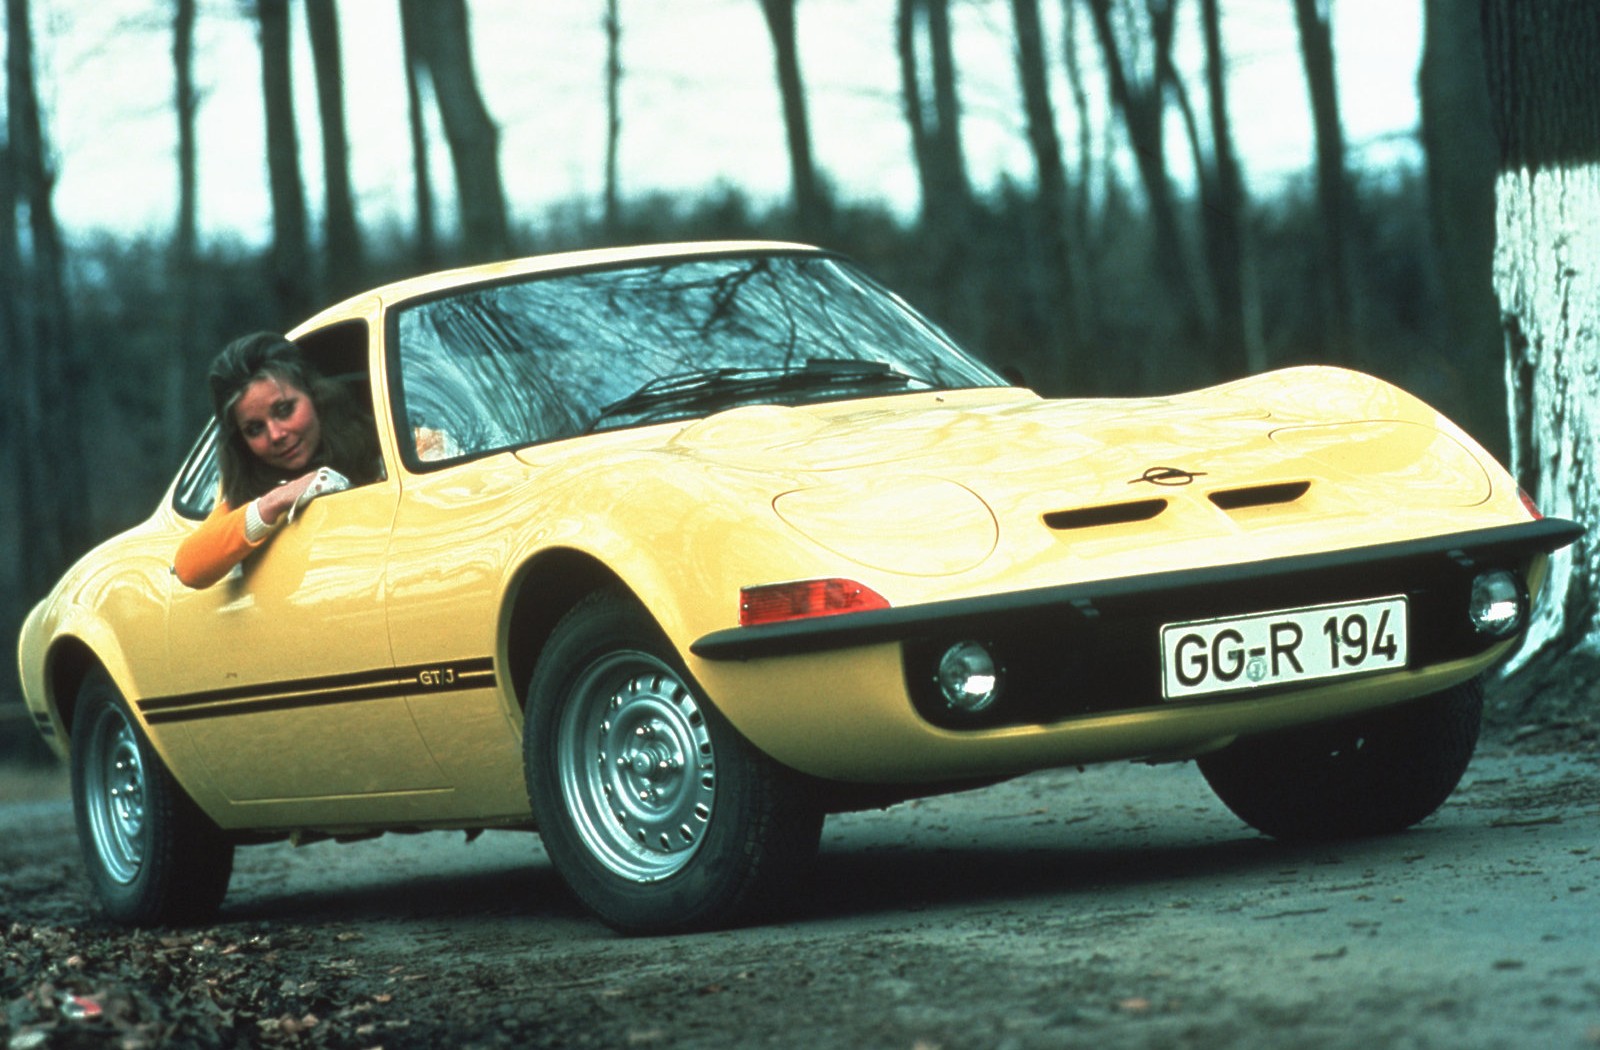 a more sporty look on the GT/J |
| Not a true German car... |
|
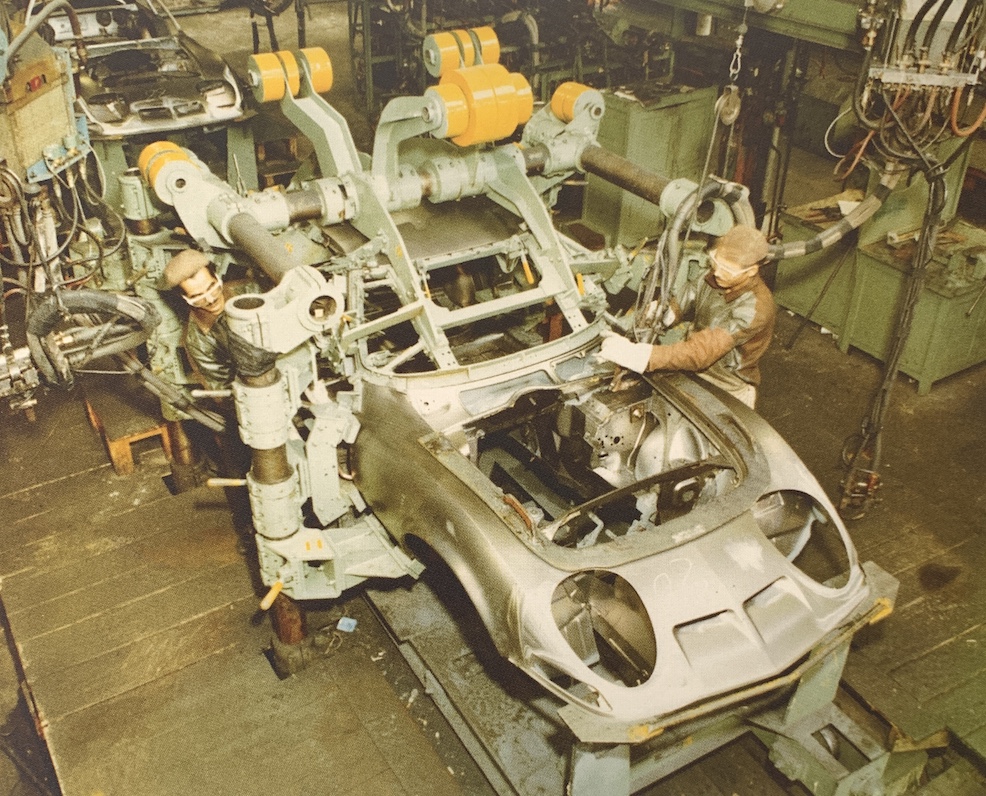
You would expect the Opel GT to be a German car, but actually, it was the result of a cooperation between France and Germany. The bodies were manufactured by Chausson in Gennevilliers (in France, near Paris) and were transported by truck to Brissonneau&Lotz in Creil (also in France, some 60 km more to the north) to be painted and to receive their complete interior and electrics. They were then loaded on trains for transport to Bochum were the cars were completed with undercarriage and engine (standard Kadett and Rekord off the shelf items). The interesting thing for me as a Belgian is that the complete production of over 103.000 cars was transported across my country by train. I would have loved to spot a train like this in my youth... Also interesting to know is that the 70.000+ cars which were exported to the USA, were again transported across Belgium to the port of Antwerp to be loaded on ships destination USA. |
 Opel GT bodies were manufactured by Chausson in France...
...and were transported from Gennevilliers (F) to Creil (F) by truck...
...to Brissonneau&Lotz where the bodies were painted and equipped with electrics and interior...
...to be transported by train (through Belgium) towards Bochum in Germany where the cars were completed with engine and undercarriage
the cars exported towards the USA all passed through the port of Antwerp |
|
|
|
Philip Avonds |
| Doornhofstraat 6 |
| B-8670 Koksijde |
| Belgium |
| e-mail: info@avonds.com |